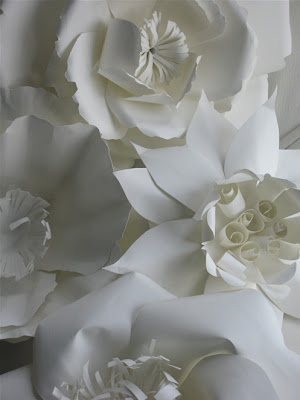
Monday, November 30, 2009

Carol Gearing

Blogging puts me in touch with creative people on a daily basis... I like the way their art or craft inspires me and often results in my looking at the world in new ways. Carol Gearing's eye-catching work is no exception. Recently after I left a comment on her blog, she wrote to thank me and expressed that she too, loves paper. Carol's art cannot be summed up easily, as her accomplishments are so diverse... photography, drawing, painting, writing. One large design project that especially caught my eye was the incorporation of paper art - cutting and sculpture - into an interior space. For this serene entrance hall in a home atop a beautiful Yorkshire dale, Carol cut flowers from ivory handmade cotton rag paper with scalpel and scissors, and then sculpted them by hand before clustering in a clear Perspex box. She wanted to bring the essence of nature into the calm, spacious interior, but not in an obvious way.
paper butterfliesIn the past year Carol approached paper cutting as a relative novice, but soon mastered pristine, organic forms of nature. Carol has been exploring other avenues with her paper art too. She says this Dark Night piece was just a flight of fancy, but it's the most popular image on her Flickr site, way above anything else.Recently Carol was on a path of colorful crepe paper shoes. She made them as more of a personal journey, but they attracted the attention of the U.K.'s Guardian newspaper's Art and Design editor, leading to interest from a New York ad agency. Where will Carol's creativity take her next? She tells me she's been designing patterns based on her sketches and photography that can be used in future projects... glass panels, for example.... think of damask with a twist. Follow Carol's odyssey via her website.

Friday, November 27, 2009

Gilded Ornament Gift Card

This is a simple little card I made for CardMaker Magazine last year. It's pretty quick to put together and makes use of punched fern fronds in shades of green. (Punch Bunch medium fern) Abracadabra... transform them into an evergreen branch.As you've probably noticed by now, I'm a fan of gilded quilling paper. The ornament requires just one strip of gold-edged red... love the bit of glitz the shiny metal adds.

Crimp the bottom of the card front and punch a hole for the gold cording with a 1/8 inch punch. I bet you'll be able to whip up a batch of these in no time.

Wednesday, November 25, 2009

Harvest Time - Quilled Vine

After perusing pages of embroidery patterns, I was inspired to quill this Jacobean vine... the flowing layout and scrolls seemed like a perfect fit for paper filigree. It's my only Thanksgiving decoration on display at the moment... eek, I'd best get busy and pull together a table centerpiece. Tomorrow is coming quickly!click for closer view

But first, let me say I love working with Jane Jenkins line of quilling papers - in this case, autumn shades. They're just the right weight, roll so smoothly, plus have a nice bit of sheen to the strip edges. If you're in the U.S., check with your online quilling supplier as a few carry Jane's papers.

And Happy Thanksgiving to those of you who will be celebrating. Once the dinner table has been cleared and the football games are over, I hope you'll find a moment to come back to all things paper. I'll be featuring a cornucopia (when does one get to use that lovely word except at this time of year?) of quilled Christmas projects all month long, plus lots more inspiration from the wide world of paper.

Monday, November 23, 2009

Raphael Art

Whenever I think I've seen it all when it comes to what can be done with simple strips of paper, I'm surprised by something beautiful and new...

Kaduaki Kagawa is a Japanese designer who has developed a unique process of manipulating paper. He calls his method Raphael Art, no doubt a nod to the Renaissance painter known for the grace and perfection of his angelic portraits.In 2000 Kaduaki began embellishing his own computer illustrations with narrow, curved strips placed on edge. What he does is not quilling - he doesn't coil paper as is typically done - but the tools and paper necessary for his craft are quite similar to the ones quillers use. 1/4 inch (5mm) strips, cutting blades, and tweezers are essential to his method of carefully placing fine details. Letters are balanced flawlessly on edge.After perfecting his system, Kaduaki designed wedding announcement kits and card stands. He then began offering a variety of classes in which he demonstrates the details of setting up one's workspace, the products that work best, and how to position the cutting blade in order to duplicate his precise designs. Young women, and sometimes couples, who are engaged to be married take his classes to learn to create their own personalized Raphael wedding board announcements.Christmas, angels, and other winged creatures are common themes in Kaduaki's designs, many with a whimsical touch.
Visit the Gallery at Raphael Art to see many more examples of Kaduaki's work, as well as a video in which he demonstrates his teaching method.

Sunday, November 22, 2009

Two Updates: Hila Rawet Karni and Dudecraft

Perhaps you remember an earlier post about Hila's incredible folded paper necklaces... it's been one of the most popular topics here at all things paper. She works with beautiful papers to create wearable art objects. Hila emailed me with the good news that she's just opened an Etsy shop. Besides paper, Hila uses surprising industrial materials such as stainless steel buttons and spring coils in many designs. There's no doubt in my mind her innovative jewelry will continue to attract lots of well-deserved attention. Best success, Hila!

And secondly, I just had word this morning from Paul Overton, aka Dudecraft, that he's posted a tutorial on the making of his fantastic cut paper portraits. You can watch Paul's video here.

Friday, November 20, 2009

Crafterall and Green Post

Minnesota's Marnie Karger and Florida's Kendra Zvonik have joined a basic aspect of their paper crafting businesses into a brilliant pairing... what Marnie generates in abundance, Kendra reuses.

Let me start at the beginning... Marnie makes topographic maps as wall art, and also hand-cut greeting cards. She calls them fictional landscapes, inspired by Minnesota's many lakes. A practiced, steady grip on a craft knife brings about perfectly layered, swirled designs of soothing colors.

Crafterall topography
Crafterall handmade cards - Topography

Crafterall - Many Layered Topographic

I find the fresh, spare style of her designs so appealing.

Crafterall - Mod Ornaments

Crafterall - Retro Poppies

Crafterall - Falling Leaves

Ah, but all the cutting generates SO many small scraps... what to do?


Luckily what began as a friendship via Etsy, blossomed into a collaboration when Marnie (Crafterall) asked Kendra (Green Post) if she would be able to make notecards for her (Marnie) to send out with orders, by using the never-ending supply of richly colored cardstock pieces her craft knife leaves behind.


Happily Kendra loved the idea and it turned out to be a match made in heaven.

Green Post wildflower seed gift tags - Plantables

Green Post - After Craft paper sheets

Kendra, an eco paper crafter and abstract painter, is always in need of a steady supply of junk mail, hang tags, receipts, and yes, Marnie's scraps, to make a varied line of earth friendly paper products. Her skill turns what would otherwise be sent to the recycling center into something beautiful and useful.

Green Post magnets -Terra Firma Cubes

Kendra makes paper pulp from the colored bits and then forms it into After Craft paper sheets, plantable gift tags and magnets, (lovely little party/wedding favors) and even a tough board-like material she calls Eco-Art Panels, an ecological substitute for usual drawing/painting surfaces.

Green Post - Eco-Art Panels

Green Post - Holiday Eco Ornaments

Marnie and Kendra enthusiastically say they're fueled by one another's creative energy and each is a genuine supporter of the other. Rather than exchanging money, they exchange paper, and in turn their businesses are advertised - pretty smart!

Wednesday, November 18, 2009

Quilled All Occasion Card Tutorial

A visit to nearby Longwood Gardens inspired this card... so many wonderful flowers on display, including some beauties that gave the illusion of growing upside down. I came home wanting to duplicate them in paper.The flower, quilled with Paplin graduated color strips, is mounted on a gilded frame sticker from Martha Stewart's line at my local Michaels store. Love these! The package comes with two sheets of several frames each, in a variety of beautiful shapes.

In my stash of crafty bits, I'd been saving a gold embossed floral filigree design, stamped a few years back at a Stampin'Up workshop... perfect to use as a layering paper. Another rectangle of antique gold paper, a layer of gray cardstock, and a strip of metallic ribbon finish it off. Yes, you've guessed it... I'm a fan of subtle metallic accents; can never get enough.

Card Supplies:
Cardstock - khaki, gray, ivory
Metallic paper - antique gold
Paper cutter with scoring blade
Double-stick tape, tape runner, or glue stick - to adhere layers
Versamark stamp pad
Rubber background stamp - filigree scroll design
Embossing powder - gold
Heat gun
Pencil
1. Prepare khaki card blank. Cut a 6 1/2 inch x 11 inch piece of card. Score at midpoint of length (5 1/2 inch mark) and fold, creating a 5 1/2 x 6 1/2 inch card.
2. Stamp design on ivory card with Versamark. Sprinkle generously with embossing powder, tap off excess, and heat until powder has melted and raised. When cool, trim rectangle to 2 3/4 inches x 4 inches.
3. Cut gold paper ( 3 3/4 x 4 3/4 inches) and gray cardstock (4 x 5 inches) rectangles.
4. Adhere layers on card as pictured.
5. Adhere frame sticker (2 x 3 inches) to center of embossed rectangle.
6. Mark center of frame with pencil dot.

Quilling Supplies
:
Tool - needle or slotted
Paper - 1/8 inch graduated color, olive green, orchid
Glue - suitable for paper
Scissors
Ruler
Tweezers
Paper piercing tool or T pin - to apply glue
Glass head pins
Plastic lid - to use as a glue palette
Non-stick workboard - cork or Styrofoam - something into which you can stick pins
Damp cloth - to keep fingers free of glueIf you're new to quilling, my tutorial here has all the information you'll need to get started. Keep in mind that at first glance, quilling looks more complicated than it is. Many of the different shapes start with the very same building block... a round coil that's pinched in different ways to create a variety of shapes. To make most types, you'll slide the strip of coiled paper off the tool and glue the end, forming a circle - then pinch as shown/described below.
loose coil on needle tool (or you can use a slotted tool - it's usually easier for beginners)

To quill the shapes for this design:
Marquise (make 1) - Make a 4 inch loose coil and glue end; pinch opposite sides, making two points.marquise

Shaped marquise (make 4) Make a 4 inch marquise. Holding points of marquise, curve one end to the left and the other end to the right, making it resemble a leaf.shaped marquise

V scroll (make 1) - Fold a 4 inch strip in half; roll each end outward, away from midpoint.Heart scroll (make 1) - Fold a 4 inch strip in half; roll each end inward, toward midpoint.Loose scroll (make 3) - Roll a 3 inch strip; smooth paper allowing tail to curve slightly, leaving other end coiled.
Work on non-stick board:
1. Make blossom: Glue the point of heart scroll inside V scroll. Glue one end of marquise inside the heart scroll.
2. Make stem: Arrange and glue three loose scrolls as pictured.
3. Make leaves: Glue two shaped marquises side-by-side for each leaf, pressing into leafy shape. Glue onto loose scroll stem.
4. Spread a shallow puddle of glue on a plastic lid.
5. Grasp the finished flower with tweezers and dip the underside gently in the glue. Position it in the center of the frame.
Tip: When working with graduated color quilling strips, if you would like the color variations to be the same, as I did for the leaves with each coil having a white center, you'll need to cut paper lengths from the same portion of strips. Graduated color strips are available from most online quilling suppliers.