Quilled Photo Jewelry and Flower Pendant Tutorial

Via Twitter, I came across a family-owned and operated company in Michigan called Photo Jewelry Making. They sell a wide variety of bracelet, pendant, brooch, and ring blanks, as well as all of the necessary supplies to transform your photos into wearable art. I love to make quilled jewelry and realized many of the blanks could easily hold quilling instead of a picture.

Quilled initial pendant

Placing a quilled monogram in a silver rectangle is sure to elicit the wow factor, plus the frame stabilizes the design. The textured background is a nice bonus too.

Quilled flower pendant

This piece is a magnifying glass - ahem, something I'll probably need in the not too distant future with all the close work I love to do. Meanwhile though, I shortened the beautiful silver chain by doubling it, and added a Japanese quilled motif to the beveled surface.

Quilled flower pendant

A graphic by Sharon Bennett inspired the design. You might remember the quilled bird pendant I made which was inspired by another of her illustrations.

This clear glass locket is double-sided - such a great feature, as you can print out two pics for double the viewing pleasure.

Photo necklace

Originally I planned to use it for the quilled E, but despite cutting 1/8 inch strips in half, the paper was a bit too wide for the clasp to shut.

Happily, Plan B worked out perfectly... despite the crazy, hot weather that has made our garden look quite sad, there was one bright stem of purple balloon flowers in bloom. I grabbed my camera and the EZ-Photo Resizer software, and in no time at all, printed out a picture just the right size to fit the frame. If anyone asks, I can proudly say, "Yes, from my garden!"

Quilled flower pendant tutorial

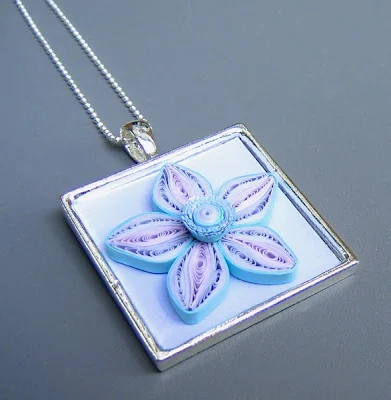
This one inch square silver pendant frames a single quilled flower. I chose the iciest shades in my paper stash to make a summertime blossom, and cut a square of pale blue, pearlized paper as the background. The mini-ball sterling silver chain adds to the delicate look.

Quilled flower pendant tutorial

I used standard 1/8 inch quilling strips to make the flower. If you're new to quilling, check out my tutorials here and here for all the scoop you'll need to make this project.

Recommended quilling and paper craft supplies can be found in my Amazon shop

Make:
6 inch lavender marquise (make 10)
6 inch pale rose marquise (make 5)

Flower petals:
1. Glue a lavender marquise on each side of a pale rose marquise for each of the five petals.
2. Hold marquises in place while the glue dries, pinching the sides to form the petal shape.
3. Glue a strip of pale turquoise paper around each petal twice as an outline.
4. Glue petals together as pictured to make the flower.

Fringed flower center:
1. Finely fringe a 3 inch lavender strip and a 3 inch pale rose strip.
2. Stack one fringed strip on top of the other and glue them together at one end. Glue a 3 inch lavender strip to the glued end of the fringed strips.
3. Insert the free end of the lavender strip into the slot of a quilling tool and roll toward the fringed strips. Continue rolling to the end of strips. Apply a small amount of glue and slide flower off tool.
4. Glue the fringed flower in the center of the petals and fluff out fringe.


Photo frame pendantPhoto frame pendant

The company also sells a variety of more ornate frames... I think these silver-plated and brass pendants would lend a lovely, antique look to a filigree design. Thanks, Photo Jewelry Making, for offering lots of new and exciting possibilities for quilled jewelry!

All Things Paper is an AWIN (Etsy ) affiliate.


Ann Martin
Ann Martin

This is a short biography of the post author and you can replace it with your own biography.

Comments

  1. Such a nice idea for quilled jewelery. I love the magnifying glass piece .Always a pleasure to see your quilled jewelery.

    ReplyDelete
  2. Just a quick note to let you know that a link to this post will be placed on CraftCrave today [21 Jul 12:00pm GMT]. Thanks, Maria

    ReplyDelete
  3. What a neat idea! I especially LOVE the first pendant. Your balloon flowers look great! Mine are sort of sad this year. I've been so busy with stuff that I haven't been able to water as regularly, and 8 days in a row of 100+ temperatures is sucking the life out of mine!

    ReplyDelete
  4. What a great idea! I love the textured background in the first pendant.

    ReplyDelete
  5. I found them the other day too ... so many ideas so thanks for sharing YOURS ... all I can say is WOW!

    ReplyDelete
  6. Hi Ann,

    Love this idea a lot, quilling is on my Someday.....list, it may have to be sooner than later. I can see this in a paper bead necklace I have in mind. Janice Mae

    ReplyDelete
  7. What a great idea. Those are just the perfect size for the quilled pieces. I really love the magnifying glass.

    ReplyDelete
  8. Nice pieces! I love the idea of using quilling in jewelry. Unique, that's for sure.

    ReplyDelete
  9. This is such a brilliant idea!
    It's amazing how metal and paper work so well together, but my favorite has got to be the magnifying glass piece. Wow, silver paper *so pretty* - I've never even touched something like that.

    I've been reading your blog for a while, but never left any comment; I just want to let you know that I admire your work very much. Oh, and thanks for taking time to comment on my quiling.

    ReplyDelete
  10. I never thought quilled paper would translate well into jewelry. Glad to see that I was proved wrong! Your single flower quilled pendant is exquisite.

    ReplyDelete
  11. So beautiful, I love the way the silver sets off the delicate quilled motifs! And such a lovely way to give others a first look at the art of quilling!!

    ReplyDelete
  12. Ann, those really are stunning! The magnifying glass piece is my favorite.

    ReplyDelete
  13. ohhh the magnifying glass piece is so clever!

    ReplyDelete
  14. I love your pendants. Earlier this year I made some quilled jewelry in similar pendants using different quilling techniques and flowers - we must think alike! They made great mother's day and teacher gifts at the end of the school year.

    Your magnifying glass pendant is stunning!

    ReplyDelete
  15. Your work is as beautiful as always! Thanks for the link to this cool resource. I've just started researching jewelry findings, etc. which might hold my hand stitched paper art - been thinking pendants. Photo Jewelry Making offers a nice selection.

    Thanks Ann!

    ReplyDelete
  16. They are beautiful! I especially like the one with a Japanese quilled motif.

    ReplyDelete
  17. Absolutely amazing! I never would have thought of quilling and jewellery. That magnifying glass piece is just stunning! Beautiful work!

    ReplyDelete
  18. These are beyond stunning. I'm speechless. I love the idea and your execution is flawless. I must do one--I've got the itch now!

    Thanks so much for linking up at Craftastical!

    ReplyDelete
  19. Thanks so much for the lovely comments, everyone! I'm excited about more of these someday - think they'd make nice little gifts and each one really doesn't take all that long to do.

    ReplyDelete
  20. Thanks for sharing Ann. Wow, these are so beautiful, love the magnifying glass one as well as its so elegant. It always amazes me to see how creative crafters can be. This is such a fantastic idea. Just one question, how do you keep the design free from dust/dirt? Also thanks for introducing me to Daydreams, I adore Suganthi's creations.

    ReplyDelete
  21. Thank you, Allycat. I have to say I don't find dust/dirt to be much of a problem with quilled jewelry. I just wear it if I'm going out and then put it away in a box when not in use. Treat it like you would any fine jewelry and it should be okay.

    ReplyDelete
  22. Thank you for sharing Ann!!! what a great idea to transform your photo into the wearable art. Lovely piece of jewelry.

    ReplyDelete
  23. I love your paper jewelry designs.
    I would like to feature your work @ The jewelry Observer Blog!!! Please check it out : www.jewelryobserver.com
    you can apply on the website @ http://www.jewelryobserver.com/featured-artist

    ReplyDelete
  24. I was thinking quilled jewelry would be beautiful, so I searched for information. I found your blog and I really like the jewelry you've made and the information you provide. Thank you.

    ReplyDelete
  25. Thanks everyone, and Jenalee, I hope you'll give making quilled jewelry a try.

    ReplyDelete
  26. HJC Editor Jane, thank you, but I prefer that you not post a link on your site as it appears it is linked with diylessons.org which is a commerce site for fee tutorials.

    ReplyDelete
  27. These are all lovely, Ann, but I especially love the magnifying glass pendant. Just found this on craftgawker.com

    ReplyDelete
  28. it's jus' so beautiful....love em'....<3<3<3

    ReplyDelete
  29. Ann! This is another of your gems! I will definitely feature it in a future blog post - it's a wonderful addition to my collection of quilled paper jewelry tutorials. Pearl

    ReplyDelete
  30. Soooo beautiful!! I am wondering where you get the magnifying glass and how you attached your quilled design. Is it just glued on the back? Or is it inside, like is the glass two pieces? And where can you buy that type of glass? :-)

    ReplyDelete
    Replies
    1. Thanks very much. The magnifying glass was from photojewelrymakingcom. The quilling is glued to the front of the magnifier.

      Delete

Post a Comment

Thank you for taking the time to leave a comment. I try to respond to questions within 24 hours, so please check back.