DIY: Quilled Bird Necklace
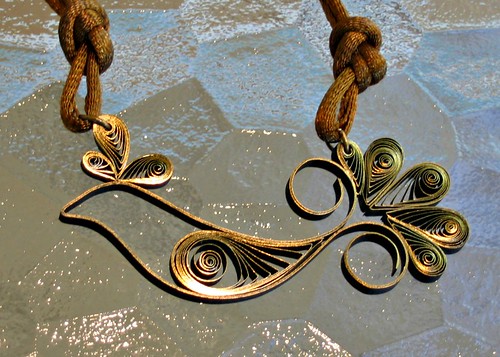
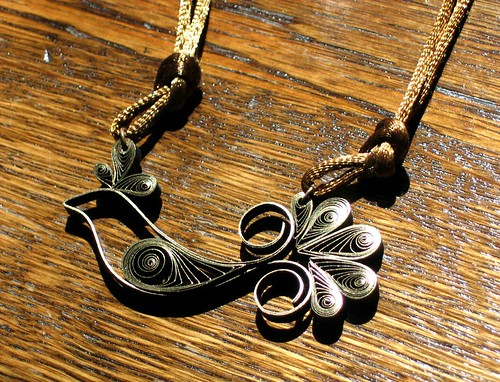
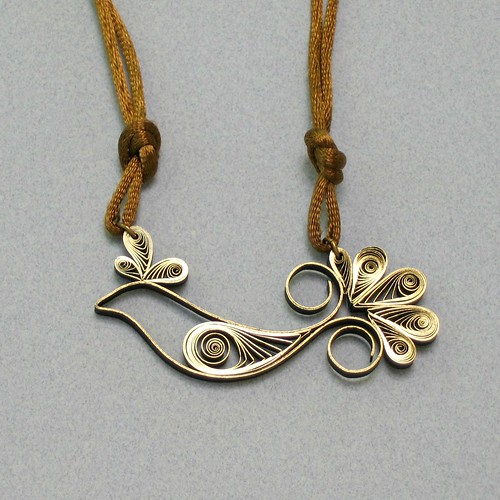
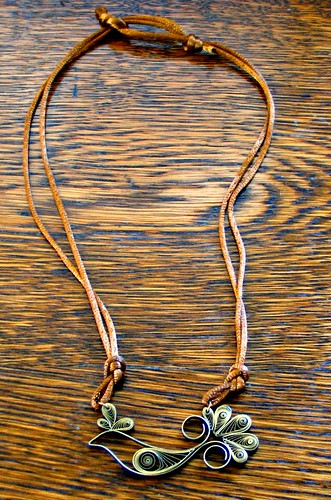
You might remember this quilled bird necklace I made a few years ago...
I still receive compliments whenever I wear it, so I'd like to share the how-to so you can make one for your own personal use. Let's start at the very beginning...
If you're brand new to quilling, just a few inexpensive supplies are needed - a rolling tool, paper strips, and glue. Keep in mind my first tool was a cake tester from my kitchen drawer... in other words, any slim, stiff wire will do. Cut a sheet of copy paper into narrow strips to use for practice. If you decide to purchase a tool, there are two types - needle or slotted. The slotted tool is easiest to use; its only disadvantage is that the slot leaves a crimp in the center of a coil. If this bothers you, try an ultra-fine slotted tool or a needle tool. People usually find the needle tool is more difficult to master, but the reward is a perfectly round coil sans crimp.
You will need:
Quilling paper - gold-edge black, 1/8 inch (standard width) - Quilled Creations
Quilling tool - needle or slotted
Craft glue - I like to use clear gel adhesive
Ruler
Scissors
Tweezers - mine have a precision tip
Toothpick, glass-head pin, or paper piercing tool - to apply glue
Plastic lid - to use as a glue palette
Jump rings (2) - 5mm
Jewelry pliers (2) - flat nose are my fave
Satin cording - bronze, about 48 inches
Recommended quilling and paper craft supplies can be found in my Amazon shop. [Note: I am an Amazon Associate]
And now, the basics:
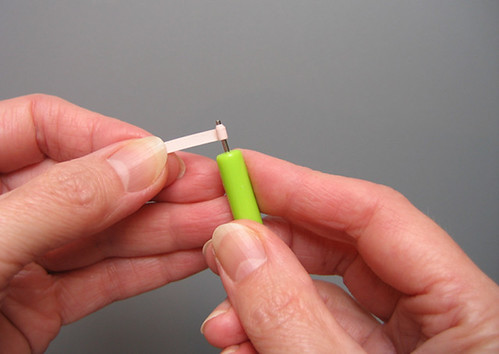
Roll a coil with a slotted tool: Slide strip end into the slot and turn tool with one hand while guiding strip with the other hand.
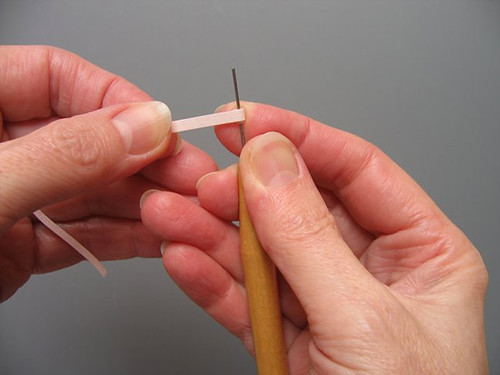
Roll a coil with a needle tool: Dampen fingertips and roll strip around needle with the thumb and index finger of one hand while holding handle with the other hand. Be sure to roll the paper, not the tool, and apply firm, even pressure.
Allow coil to relax:
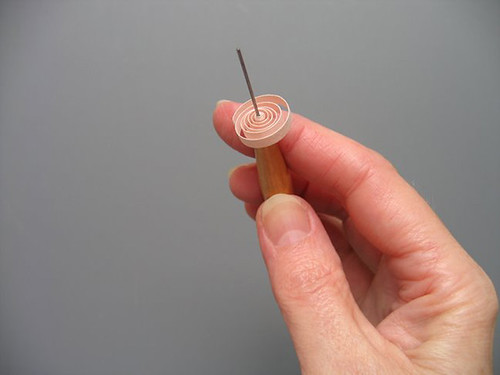
Whether using a slotted tool or needle tool, when the strip is fully rolled, allow coil to relax and slide it off the tool. This is called a loose coil, the basic coil from which many other shapes are made. For the bird pendant, you'll be making teardrop and shaped teardrop coils.
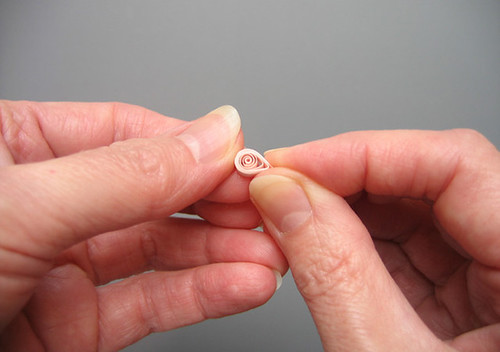
Make a teardrop:Roll strip, slide it off the tool, and pinch to a sharp point.
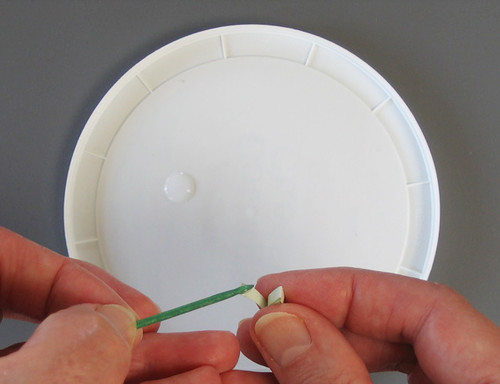
Use only a tiny amount of glue on the strip end, applying it with a toothpick, pin, or tip of a paper piercing tool. Hold in place for a few moments while the glue dries.
Make a shaped teardrop: Use fingers to curve the tip of a teardrop coil.
Step 3: Make 5 tail feathers (teardrop coils) and glue them in place:
10 inches
8.5 inches (make 2)
7 inches
5 inches
Step 4: Make an 18 inch shaped teardrop coil. Glue it inside the body outline as pictured.
Step 5: Turn pendant over and reinforce all of the joins by applying a dot of glue wherever coils meet. Allow glue to dry before going on to the next step.
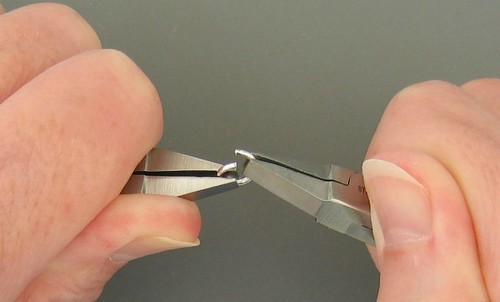
Step 6: Attach a jump ring to the largest head feather and a tail feather as pictured. To open the jump ring, grasp each side of the ring split with pliers. With a gentle twisting motion, push one side away from you while holding the other side steady. Slip ring through coil and reverse motion to close.
Step 7: Cut cording in half, thread one piece through a jump ring and tie a single knot close to the bird. Repeat with the opposite jump ring. Finish off with an adjustable sliding knot so the necklace can be slipped on and off over your head. I followed these sliding knot instructions (video). If you prefer, a length of necklace chain can be attached to each jump ring. Fasten with a clasp.
There - something new to wear tomorrow!
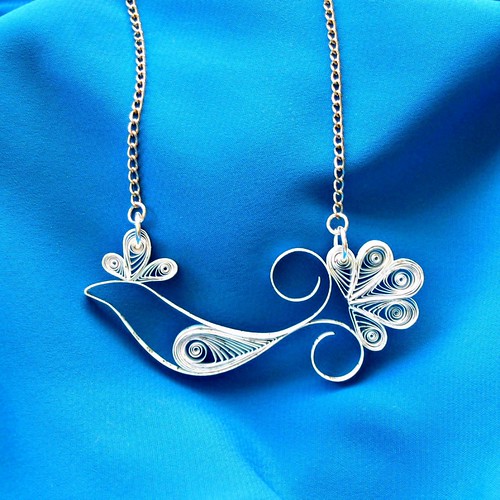
And here's a new variation, my Bluebird of Happiness made from tax forms... why I made it.
A little fyi... Quilling has been around for ages... centuries actually, and has changed very little over time except for all of the specialty papers that are available... graduated colors, two tone, pearlized, and even silver, copper or gold-edge like the kind used to make this bird. Not only is the metallic edging beautiful, but it lends extra strength. I have to say though, rolled paper is surprisingly sturdy on its own with or without a metallic edge, making it especially suitable for pendants or earrings.
If you don't have access to metallic edge paper, you can run a gold leafing pen along the edge of plain quilling paper before rolling it or press the finished bird in a metallic ink pad, such as Brilliance Galaxy Gold.
You'll find many more wearable quilled designs in my book, The Art of Quilling Paper Jewelry.
Any questions, don't hesitate to ask!
I still receive compliments whenever I wear it, so I'd like to share the how-to so you can make one for your own personal use. Let's start at the very beginning...
If you're brand new to quilling, just a few inexpensive supplies are needed - a rolling tool, paper strips, and glue. Keep in mind my first tool was a cake tester from my kitchen drawer... in other words, any slim, stiff wire will do. Cut a sheet of copy paper into narrow strips to use for practice. If you decide to purchase a tool, there are two types - needle or slotted. The slotted tool is easiest to use; its only disadvantage is that the slot leaves a crimp in the center of a coil. If this bothers you, try an ultra-fine slotted tool or a needle tool. People usually find the needle tool is more difficult to master, but the reward is a perfectly round coil sans crimp.
You will need:
Quilling paper - gold-edge black, 1/8 inch (standard width) - Quilled Creations
Quilling tool - needle or slotted
Craft glue - I like to use clear gel adhesive
Ruler
Scissors
Tweezers - mine have a precision tip
Toothpick, glass-head pin, or paper piercing tool - to apply glue
Plastic lid - to use as a glue palette
Jump rings (2) - 5mm
Jewelry pliers (2) - flat nose are my fave
Satin cording - bronze, about 48 inches
Recommended quilling and paper craft supplies can be found in my Amazon shop. [Note: I am an Amazon Associate]
And now, the basics:
Roll a coil with a slotted tool: Slide strip end into the slot and turn tool with one hand while guiding strip with the other hand.
Roll a coil with a needle tool: Dampen fingertips and roll strip around needle with the thumb and index finger of one hand while holding handle with the other hand. Be sure to roll the paper, not the tool, and apply firm, even pressure.
Allow coil to relax:
Whether using a slotted tool or needle tool, when the strip is fully rolled, allow coil to relax and slide it off the tool. This is called a loose coil, the basic coil from which many other shapes are made. For the bird pendant, you'll be making teardrop and shaped teardrop coils.
Make a teardrop:Roll strip, slide it off the tool, and pinch to a sharp point.
Use only a tiny amount of glue on the strip end, applying it with a toothpick, pin, or tip of a paper piercing tool. Hold in place for a few moments while the glue dries.
Make a shaped teardrop: Use fingers to curve the tip of a teardrop coil.
Step 1: Glue three 7 inch strips of gold-edge quilling paper, one on
top of the next. If the stack gets sticky, wipe it with a damp cloth before the glue sets. When the glue is completely
dry (a few hours or even overnight; otherwise the paper will buckle) fold the
strip in half and shape the bird outline. Curl the
ends away from one another around the handle of a paper piercing tool or
quilling tool. Apply a small amount of glue where the top and bottom of
the outline touch.
Step 2: Make 3 head feathers (shaped teardrop coils) and glue them in place:
Step 2: Make 3 head feathers (shaped teardrop coils) and glue them in place:
6 inches
5 inches
2.5 inches
Step 3: Make 5 tail feathers (teardrop coils) and glue them in place:
10 inches
8.5 inches (make 2)
7 inches
5 inches
Step 4: Make an 18 inch shaped teardrop coil. Glue it inside the body outline as pictured.
Step 5: Turn pendant over and reinforce all of the joins by applying a dot of glue wherever coils meet. Allow glue to dry before going on to the next step.

Step 6: Attach a jump ring to the largest head feather and a tail feather as pictured. To open the jump ring, grasp each side of the ring split with pliers. With a gentle twisting motion, push one side away from you while holding the other side steady. Slip ring through coil and reverse motion to close.
Step 7: Cut cording in half, thread one piece through a jump ring and tie a single knot close to the bird. Repeat with the opposite jump ring. Finish off with an adjustable sliding knot so the necklace can be slipped on and off over your head. I followed these sliding knot instructions (video). If you prefer, a length of necklace chain can be attached to each jump ring. Fasten with a clasp.
There - something new to wear tomorrow!
And here's a new variation, my Bluebird of Happiness made from tax forms... why I made it.
A little fyi... Quilling has been around for ages... centuries actually, and has changed very little over time except for all of the specialty papers that are available... graduated colors, two tone, pearlized, and even silver, copper or gold-edge like the kind used to make this bird. Not only is the metallic edging beautiful, but it lends extra strength. I have to say though, rolled paper is surprisingly sturdy on its own with or without a metallic edge, making it especially suitable for pendants or earrings.
If you don't have access to metallic edge paper, you can run a gold leafing pen along the edge of plain quilling paper before rolling it or press the finished bird in a metallic ink pad, such as Brilliance Galaxy Gold.
You'll find many more wearable quilled designs in my book, The Art of Quilling Paper Jewelry.
Any questions, don't hesitate to ask!

