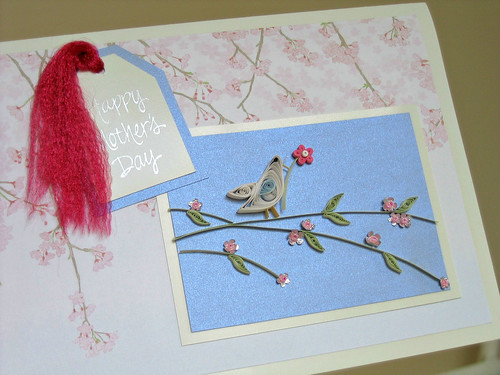
Put a Bird on It - Quilled Mother's Day Card DIY

I just thought of a project that could have been included in my quilled bird round up post. It's even timely because it's a Mother's Day card... which will be here before we know it.


Quilled Mother's Day card with bird on a cherry blossom branch


I'll detail how to make the quilled design:


Quilled Mother's Day card with bird on branch


These two photos were taken at the same time, just at different angles. The quilling is glued onto light blue metallic paper - ooh, just like a sunny day, I thought when I chose it. Yet when the camera looks at it straight on, it's gloomy gray instead. There's a metaphor in there somewhere.

Never mind... I'm sure you'll have better luck with your card! The background paper is from the fab site, Canon Creative Park - it's free cherry blossom stationery that you can print out (there is even a matching envelope).

If you'd like to make the quilled design (which was inspired by a rubber stamp), here's how:

Narrow (1/16 inch) quilling paper gives a delicate look, but standard 1/8 inch would be fine too.

1. Make the punched cherry blossoms and quilled leaves - the instructions are detailed in a Mother's Day card I made for Makezine - here's that tutorial.

2. Make the bird - roll a 20-inch white, shaped coil to which you'll add two wings - the pale blue teardrop wing is 5 inches and the white triangular one is 10 inches.

3. Add a teeny 1/2-inch black tight coil for the eye, a yellow beak and legs, and green stems. For the beak, legs, and stems, cut strips from card stock or glue two quilling strips together for extra strength since they will stand on edge.

4. Lastly, make a five petal flower using a 3-inch pink strip for each tight coil oval petal and add a 2-inch white tight coil center.

If you've never quilled before, you'll find all the instructions you'll need to get started in these quilling tutorials.

Recommended quilling and paper craft supplies can be found in my Amazon shop.  


Ann Martin
Ann Martin

This is a short biography of the post author and you can replace it with your own biography.

Comments

  1. No matter what you say on all the "flaws", it is a beautiful card.
    Gail

    ReplyDelete
    Replies
    1. Aw thanks Gail, one of these days I'll take it apart and remount the quilling.

      Delete
  2. very cute!! Ann!
    thank you for sharing!

    ReplyDelete
  3. We are our own worst critics Ann! It truly is amazing how we all see the fluid lines and cheerful colors. The gray simply plays a supporting role and try as I might, I can't see the uneven yellowing.

    ReplyDelete
    Replies
    1. Thanks Cecelia. Believe me, the pics are very forgiving.

      Delete
  4. Your work always look good and I love how you encourage beginners to try out your designs which helped me a lot when I started out.

    ReplyDelete
    Replies
    1. That's so nice of you to say, Suganthi. Thank you!

      Delete
  5. ann...I love your bird card and tutorial. licia

    ReplyDelete
  6. Ann, thank you so much for sharing this! It's beautiful. I learned paper quilling, even though I don't remember it being called this, more than 30 years ago. I was not inspired to take it to the next level then, but have recently become very interested in learning. Artists such as yourself, who enthusiastically teach others are worth their talent in gold! I appreciate it very much.

    ReplyDelete
    Replies
    1. I'm so glad you found your way here. Thanks for letting me know you enjoy my posts. It's comments like yours that make blogging worthwhile. Happy quilling!

      Delete

Post a Comment

Thank you for taking the time to leave a comment. I try to respond to questions within 24 hours, so please check back.