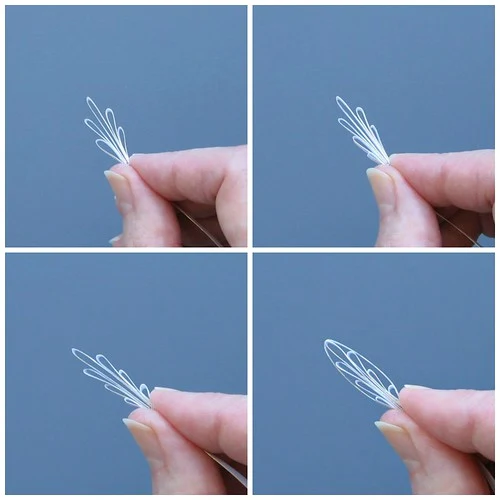
Let's get started. It will seem like a lot of steps, but fear not - they go quickly. As for what strip length to use, it depends on the size flowers and leaves you'd like to make.... I know, I know - that isn't too helpful. However, experimentation is key when it comes to quilling, and luckily, paper is inexpensive.
Note: If you prefer to see a demo of alternate side looping in action, scroll down to have a look at Shelly Krzyzewski's excellent video in which she shows how to make a variety of ASL forms. (By the way, I had the pleasure of meeting her a few years ago at a North American Quilling Guild convention here in Delaware... she creates beautiful designs!)
Make an ASL flower petal or leaf:
a. Begin by making a fold at one end of a quilling strip. (I usually use American strips that are about 24" long, but if you only have shorter strips, that's no problem. The fold should be as tall as you would like the finished petal or leaf to be, for example, 3/8" to 1/2" for a flower petal and 1" for a large leaf.
b. Without cutting the strip, bring it up from the bottom of the fold to make a loop
to the left that isn’t quite as tall as the fold.
c. Make a matching loop, this one to the right of the fold. Continue
making pairs of loops in descending sizes, as many pairs as desired. I
made three pairs for my leaves, and two or three pairs for the flower petals. Maintain a grip at the bottom of the petal/leaf with your thumb and index finger while making the loops.
d. When you've completed the loops, encircle them with the same continuous strip to create a collar.
e. Glue the end in place and gently pinch the top of the collar to create a point at the tip of the leaf or petal. You can also compress the leaf or petal to sharpen the tips of all of the loops or leave them rounded.
f. Snip excess strip at the bottom.
Tip: If you run out of paper while making loops, glue and trim excess at bottom, then glue the end of another strip at the bottom and carry on making loops and the collar.
In the video Shelly shows two methods that achieve the same result - alternate side looping and husking. ASL, which is done with just your fingers, is the freehand method I prefer. (You'll notice I don't apply glue as often as Shelly does; with practice you'll find what works best for you.)
Husking is done with a husking board, graph paper, and
pins for precision. However, if you take your time eyeballing loop
placement when using the freehand method, the result can also look
evenly spaced.
Make a domed tight coil or loose coil for the flower centers. I used 12-18" strip lengths.
Domed Tight Coil:
a. Slide one end of a quilling strip
into the slot of your quilling tool. Turn the tool to roll the paper
into a tight coil. Dab a tiny amount
of glue on the strip end, hold it in place
for a few moments, then slide the coil off the tool.
Tip: A torn strip
end blends/looks better than a sharply cut end when making a tight coil.
b. Press a fingertip against one side of the tight coil to create a dome. Apply a small amount of glue inside the dome to preserve the curve.
c. Apply glue to the underside of the domed tight coil rim with a finger or touch it lightly to a small puddle of glue you've placed on a plastic lid, then place the coil on the flower.
Tip: Tweezers are helpful when assembling quilled components.
Loose Coil: Roll a quilling strip on a tool, then release it allowing the strip to relax. Slide the coil off the tool and glue the end in place. You can manipulate the coil by unrolling and then re-rolling it to achieve a thick or thin outer edge before gluing the end, as I did with the top and bottom flowers in my example.
The other coil types that were used to make the flower petals in the arrangement are teardrops and marquises:
Teardrop: Roll a quilling strip (I used 7") on a tool, then release it allowing the strip to relax. Slide the coil off the tool, pinch one point to make a teardrop shape. Snip off excess strip at the point and apply a bit of glue to hold the end in place.
Marquise (Eye): Roll a quilling strip (I used 10") on a tool, then release it allowing the strip to relax. Slide the coil off the tool and pinch two opposing points to make an eye shape. Snip off excess strip at one of the points and apply a bit of glue to hold the end in place.
Tip: When making a flower with your ASL, marquise, or teardrop petals, work on a non-stick surface to assemble the petals.
Apply just a small amount of glue to one side of each petal near the bottom and touch it to another petal. Continue gluing and shaping petals into a circle until a flower is formed.
If your flower will have a domed tight coil center, glue the dome in place after you've glued the petals together. If it will have a loose coil center, glue the petals evenly around the loose coil.
Here's another ASL project you might enjoy making: Tree Ornament / Jewelry Pendant


