Quill a Beautiful Hummingbird: Free Project from "Modern Quilling"!

A recent post featured Jessica Janiak's brand new quilling book, Modern Quilling. The publisher, Search Press, has allowed me to feature a complete project from its pages to give quillers a taste of what they will be able to achieve by following Jess's clearly written instructions and step-by-step photographs. 
 
I chose the appealing cover model - a vivid hummingbird - as the tutorial to share with you because 'tis the season... tiny, but magnificent hummers have arrived in Delaware for the summer months. I love watching them dart about and sip sugar water at a feeder in my backyard.

 
A completed quilled hummingbird artwork, featuring vibrant blue, teal, green, and yellow paper coils forming the bird, mounted on white card within a bright yellow border, then on a larger royal blue card. A quilling tool and a small feather lie beside it.


Text of quilled hummingbird tutorial steps for making head and beak. Close-up of hands using a quilling tool and a glue brush to attach a folded lemon yellow paper strip (the beak) to a quilled element.

 
Text of quilled hummingbird tutorial steps for making body and chest. Several images of partially assembled quilled hummingbird showing the head, beak, and initial loose swirl elements for the body in lemon, royal blue, and green placed on a template.


Text of quilled hummingbird tutorial steps for making wings and tail, and mounting and framing. Inserted image on page shows collection of loose, unattached quilled marquise shapes in shades of indigo, royal blue, sapphire, turquoise, and light green, intended for the hummingbird's wings, along with small tight coils.
A line drawing template for the quilled hummingbird project, showing placement guides for all the individual quilled elements.
Print the template.
 
 
 Coil Shaping Instructions 

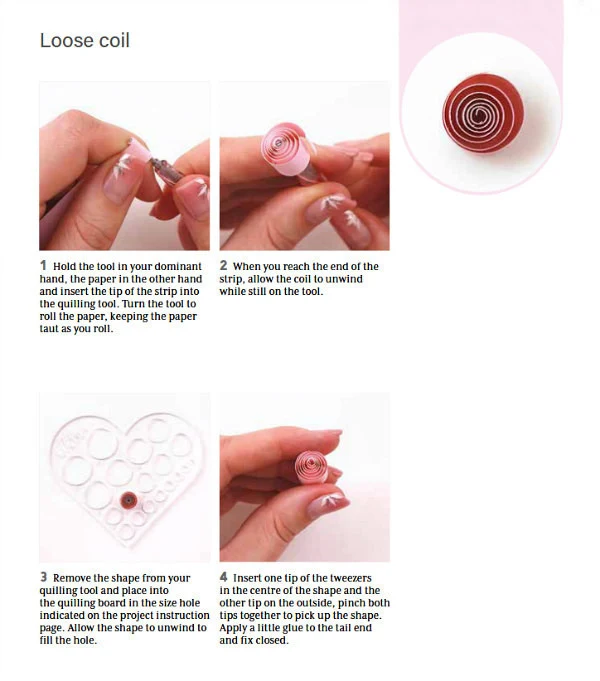
Steps for making a quilled loose coil show hands holding a quilling tool and inserting the tip of a paper strip into the tool's slot to begin rolling, a paper strip partially rolled on a quilling tool with the coil allowed to unwind slightly while still on the tool, a rolled paper coil being placed into a circular hole on a heart-shaped quilling board (sizing template) to allow it to unwind to a specific size, and hand showing formed loose coil removed from quilling board. 

Steps for making a quilled loose swirl or open scroll show hands rolling paper strip on quilling slotted tool, allowing the strip to relax, and shaping the strip with fingers once it is removed from tool.


Steps for making a quilled tight coil show close-up of a paper strip being inserted into the slot of a quilling tool, hands turning the quilling tool to roll a paper strip tightly, keeping the paper taut, applying a small dot of glue to the tail end of a tightly rolled paper strip, and holding the glued end of a tight coil to allow the glue to bond before removing it from the quilling tool.  

Steps for making a quilled hollow teardrop show hands running the metal tip of a quilling tool across a paper strip to curl it, a paper strip with a small 5mm tab folded at one end, applying a small amount of glue to the folded tab of the paper strip, and bending the curled paper strip around and sticking the glued tab to the other side to form a hollow teardrop shape.


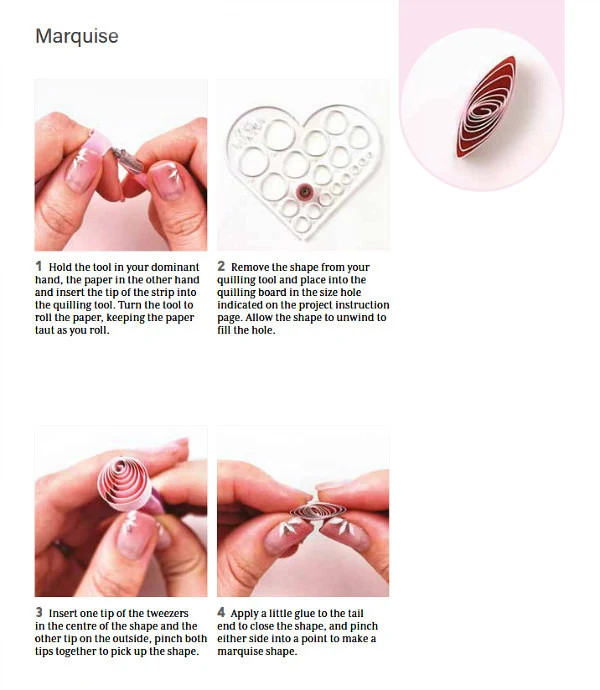
Steps for making a quilled marquise show hands inserting a paper strip into a quilling tool and beginning to roll it, keeping the paper taut, a rolled paper coil placed in a circular hole on a heart-shaped quilling board to unwind to size, using tweezers to pick up a sized loose coil, pinching the center and outer tip, and applying glue to the tail end of a coil, then pinching both sides of the coil to create pointed ends, forming a marquise shape.

In case you are having trouble seeing the project tutorial pages, I have typed out the project supplies and steps below. If you are new to quilling, refer to the instructions and photos to make each coil shape.


Crafted in a beautiful blue colour palette, this hummingbird
artwork practically buzzes with personality!


You will need:


Hummingbird template, page 125
Quilling papers, I used 10mm (3/8in)
Quilling tool 

Scissors
Tacky PVA glue
Glue brush
Quilling board
Tweezers
Plain card in royal blue and bright yellow for the mount
(optional: mine measures 19 x 15cm/7½ x 6in in blue and 15 x 10.5cm/6 x 4 1/8in
in yellow)
 

Quilling paper colours


Sapphire (12)
Indigo (13)
Light green (22)
Viridity [grass green] (24)
Lemon (39)
Royal blue (48)
Turquoise (56)
 

Quilled elements
Triangle
Loose swirl/Open scroll
Tight coil
Loose scroll
Hollow teardrop
Marquise


Head and beak


1. To make the hummingbird’s head, cut a 30cm (12in) strip in royal blue and follow the loose coil instructions on page 104, using the 15mm (9⁄16in) hole on the quilling board.
Once made, apply a little glue to the base of the coil and stick down to the template.


2. For the beak, cut a 4.6cm (1 13/16in) strip in lemon and fold in half. Using a glue brush,
apply a little glue to the base and stick down, holding in place to allow the glue to bond.


 Body and chest 


3. The body and chest of the hummingbird are made up of four different elements, the first of which are the loose swirls, one in lemon, and one in royal blue. Cut a 3cm (1 3/16in) in each colour and follow the instructions on page 108 to make the swirls. Add a little glue to the base of both swirls and fix down to the template.

4. At the centre of the body sit three tight coil shapes.Cut a 8cm (3 1/8in) in sapphire, royal blue and turquoise, then follow the instructions on page 100 to make. Apply glue to the base and fix down.

5. Next, make both large and small hollow teardrops; there are two in each size in two different colours. For the large size cut a 6.5cm (2 9/16in) in sapphire and viridity. For the small size cut a 3.5cm (1 3/8in) strip in both lemon and light green, then follow the instructions on page 112 to make. Dab a little glue on the base of each element and fix down to the template. 

6. Inside the hollow teardrops are marquise shapes in matching colours. Cut a 30cm (12in) strip in viridity and sapphire, using the 15mm (9/16in) hole on the quilling board and follow the instructions on page 107 to make.


Wings 


7. The wings on this magnificent bird are made with five different shades of marquise shapes. Cut one 30cm (12in) strip each in indigo, royal blue, sapphire, turquoise and light green, and make the marquise shapes using the 15mm (9/16) hole on the quilling board.Once all the marquise shapes are made, apply a little glue to the base of each shape and fix down to the template.

8. At the base of the body sits a ring of tight coils in seven different shades: lemon, light green, viridity, turquoise, royal blue, sapphire and indigo. Cut an 8cm (3 1/8in) strip in each color and make the tight coils.

9. Once all elements are made, apply a little glue to the base of each shape and fix down to the template.


Mount and frame 


10. To finish this piece cut and mount the artwork onto a base card of your choice and frame. I chose a bright yellow and deep blue shade to complement the shades within.


If you make Jessica's hummingbird, I hope you'll share a photo with me and/or Jessica on Instagram or Facebook... we'd love to see! 


 Ann - Instagram

Ann - Facebook 

Jessica - Instagram 

Jessica - Facebook 


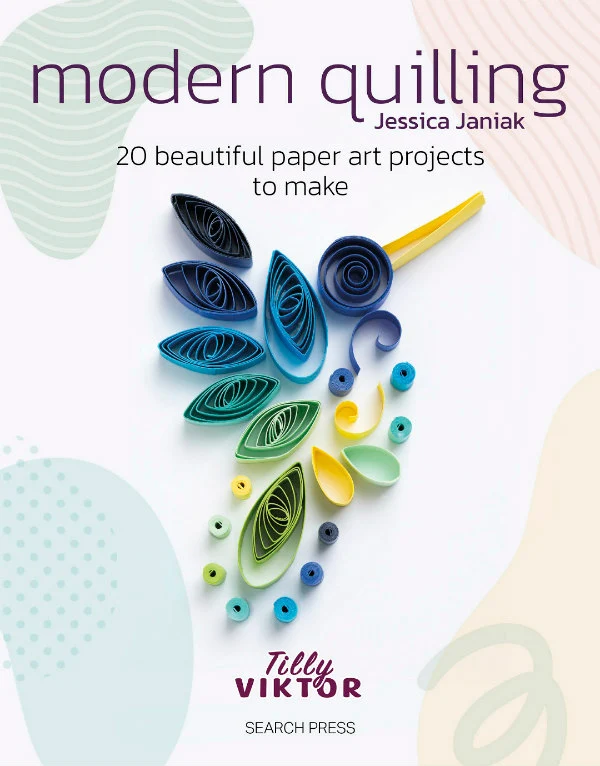
The cover of the book 'Modern Quilling' by Jessica Janiak, featuring a cascade of colorful quilled shapes and the Tilly Viktor and Search Press logos.

 Modern Quilling is available on Amazon. 
 
 
All Things Paper is an Amazon and Etsy affiliate.