Folded Rose Quilling Tutorial

Let me show you how easy it is to fold a paper rose!


fingers holding a miniature folded paper rose

I became addicted to them after seeing this pretty paper mache heart quilled by Polly Wiggins, a quilling friend in Kansas. I'm drawn to the subtle shades she chose, perhaps because they remind me of a silky-soft comforter my great-grandmother made years and years ago.

Folded Paper Rose and Fringed Flower Heart Ornament
If you've been steering clear of folded roses because they seem complicated, fear not. Just a few supplies and repetitious steps, and you'll soon realize they're really quite simple.

quilling supplies 
Supplies:

Quilling paper
- any width will work, but 3/8 inch or 1/4 inch are used most commonly. Both are available as standard sizes or cut your own strips. About a 7 inch length makes a nice, full rose.
Quilling tool - slotted tool or needle tool (I'll use a standard slotted tool for this tutorial.)
Scissors
Glue - I like to use a clear gel such as Scotch Glue
Plastic lid - use as glue palette
Paper piercing tool, T-pin, or round toothpick - to apply glue
(more paper craft products I recommend can be found in my Amazon shop)

fingers holding a folded paper rose

Directions:

1. Cut a strip of paper 3/8 inch x 7 inches.
2. Slip one end of the strip into a slotted tool from the left. It doesn't matter whether you are right or left handed, as both will have tasks. (speaking of hands... please excuse my winter-ravaged ones!)
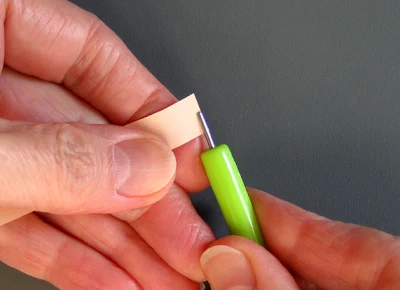
hand holding quilling strip and slotted tool
3. Hold the tool vertically in your right hand, the strip in your left, and begin to roll the tool toward the left. Make a few revolutions to secure the paper and form the center of the rose.
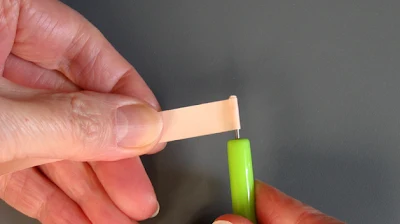
hand with a quilling strip and slotted quilling tool
4. Use your left hand to bend the strip straight up at a 90 degree angle. There's no need to crease the fold.


5. Continue rolling the tool toward the left, rolling over the fold as you go. At the same time, use your left hand to gradually bring the strip back down to a horizontal position. I realize this sounds clumsy, but try it - you'll soon see it becomes a smooth folding and rolling action.

The next three pictures show the fold/roll motion in progress... the first picture is immediately after the first fold, while rolling.


Farther along - left hand is lowering the strip; right hand is still rolling the tool.

A little farther...
Now it's time to fold and roll again.

Tip: Make a new fold just as soon as you've finished rolling the previous one.


Second fold/roll has been completed. The pic below is just before the third fold.


6. Repeat the rolling/folding as many times as it takes to use up the strip - that's all there is to it.

Look - a rose is taking shape! This is after six or seven folds... notice it's forming upside down and would make a nice little bud at this stage.


7. When close to the end of the strip, tear off any excess, slip the rose off the tool, and allow the folds to relax. Shape the rose by gently rotating or untwisting the folds a bit. Hide the torn end of the strip by gluing it to the underside of the rose.

Folded Rose Tutorial

Tip: A torn paper end will be less noticeable when glued because it blends better than a sharp cut.

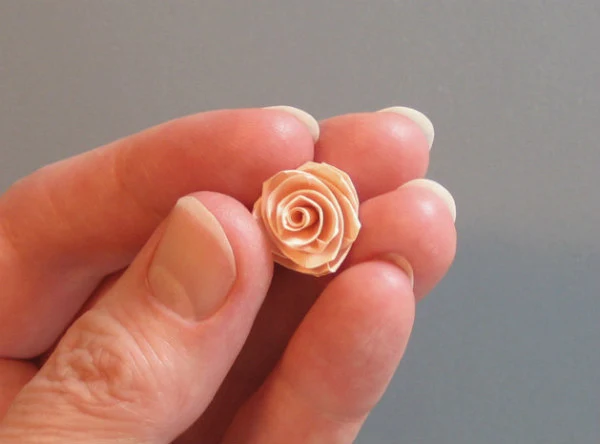
fingers holding a miniature folded paper rose


Tip: Smooth out the center crimp caused by the slotted tool by inserting and rotating the tip of a paper piercing tool or round toothpick.


If you'd like to receive my occasional and free All Things Paper newsletter that features posts like this one, sign up here.




Ann Martin
Ann Martin

This is a short biography of the post author and you can replace it with your own biography.

Comments

  1. I wish I had this tutorial ten years ago, Ann! lol It took me forever to learn a folded rose. Kept using Malinda's book instructions and couldn't follow. Great tutorial and pics!

    And Polly's heart is gorgeous. The colors are so soft and vintage. Lots of work in it. Thanks for the share.

    Have a fun weekend! (I know, lots of snow headed your way!) hugs, xo

    ReplyDelete
  2. Thanks for the tutorial!!! I was wondering how these pretty roses were done.

    ReplyDelete
  3. The heart is beautiful!! AND that tutorial is great! I've tried this before, but dummy me didn't realize that the rose formed up-side-down! Once I got to fold 4 or 5 and saw that it didn't look like a rose (on top) - I quit! Now I'll have to have another go at it!

    ReplyDelete
    Replies
    1. Me too! I could never make these paper roses but always wanted to. Mine looked like a mangled mess - didn't know they formed upside down. :) I'll have another go at them as well. Thanks!

      Delete
    2. Wonderful... I hope you'll give them a try! Thanks for your comments.

      Delete
  4. Lovely, clear instructions, thank you. Can't wait to try them

    ReplyDelete
  5. OMG Ann, that ia the coolest tutorial ever..I really want to try it. As you know I am a beginner at quilling..can you tell me where to get that tool?
    Please email me if you have the time.
    heatonup@verizon.net

    Priscilla

    ReplyDelete
    Replies
    1. Any quilling tool should work. They seem them on Amazon cheap. You can buy a whole quilling kit for about 15-20 dollars.

      Delete
  6. oh and I can not wait to see the next tutoril for these flowers :)
    I want to try this asap :)
    Priscilla

    ReplyDelete
  7. this tutorial is great thanks ;)

    ReplyDelete
  8. Wonderful tutorial and I cannopt wait to try it as I am doing an srt project for a judged show and the roses will fit in perfecting with my art project. I do nto have 1/4 strips so Iwill be sutting them myself. I'll let you know how it turns out.
    Thanks again!
    Audrey

    ReplyDelete
  9. So glad you all are enjoying the tutorial - thanks so much for taking the time to leave a comment.

    Priscilla, and anyone else who is wondering about the tool... it came with the Twirled Paper book/kit by Jacqueline Lee.

    Molly, yes... SO snowy here today. A great weekend to stay in and make things!

    ReplyDelete
  10. Beautiful tutorial! I can't wait to try it!

    ReplyDelete
  11. Hi Ann, It was such a surprise to hear from you on my blog. I only just started it 4 days ago and it needs a lot of work. I enjoyed your tutorial, even after folding over a thousand of them from pearl paper for my daughter's wedding last August! I have been following the many very interesting articles on your blog, but not commenting as often as I should. Thanks again for taking the time to say hi! Blessings

    ReplyDelete
  12. Making the rose upside down in genius! I've been making these a while and i always get annoyed by when its time to stick and seal them! this will definitely help! Thanks a bunch!

    ReplyDelete
  13. Dear Ann,

    I have been meaning to write you a message of gratitude for your informative and inspiring blog. I check it every day! I am an art teacher in a Philadelphia elementary school. I have done beginner quilling in the past few years for myself, but have always hesitated to introduce it to my 3rd to 8th grade students. Thanks to you, I am making it the focus of our Easter-Mother's Day-Father's Day projects.

    If you ever know of any workshops/classes given locally (I would travel to Maryland!), please let me know, donnabridy@aol.com

    ReplyDelete
  14. So very nice to hear from all of you; thank you. Mary, I'm thrilled you'll be teaching quilling to your students. I think they'll love it! I'll definitely let you know if I hear of classes in the Philly area.

    ReplyDelete
  15. Thanks for the tutorial on folded roses, one technique I find difficult. Your instructions are very clear and easy to understand.
    licia

    ReplyDelete
  16. shukriya (thank you)..
    for sharng.. its a beautiful tutorial...

    ReplyDelete
  17. Great tutorial, really clear and easy to follow. Will try again to make a prefect rose!! Thanks.

    ReplyDelete
  18. Ann - Congrats on your Craft Magazine feature!! Good going!

    ReplyDelete
  19. Thanks for your kind comments, everyone!

    ReplyDelete
  20. After trying this method of roses, though I've found it easier, i must admit that i am appalled by the triangular nature of the majority of mine instead of the lovely random rounded shape of yours as shown.... is there a way to avoid that? i do try letting the rose settle in the end before gluing, but unraveling, leads to a loose coil, which isn't quite appropriate either?

    Feedback would be great! thankyou!

    ReplyDelete
  21. Embee, the key to avoiding the tri-cornered hat look to roses (yes, I've made my share of those!) is to make sure you keep the folds close together. Just as soon as you finish rolling over the previous fold, fold again. Be really gentle about the unraveling too... just untwist a teeny bit; you might not even need to do it. Let me know how it goes, if you get a chance.

    ReplyDelete
  22. Oh my. I love quilling though I am still quite a novice and this is just SUPERB! I think even I can do it! I am going to give it a try! Thank you so much for the photos and how to!

    ReplyDelete
  23. Thanks Melanie and Elaine, I hope you'll give the rose a try. I'm sure you can do it!

    ReplyDelete
  24. Thanks for the tutorial. I´ve followed him and was great fun.
    The result is here:
    http://matxalen-miniaturasycasasdemuecas.blogspot.com/2010/02/rosas.html

    ReplyDelete
  25. I *must* get a tool like that! Love this! :) TFS!

    ReplyDelete
  26. Thank you for this tutorial. The heart looks so good.
    Eveline.

    ReplyDelete
  27. Thanks for this great tutorial. I'm going to hobby lobby tomorrow and guess what I'm getting!!!

    Blessings,
    Christine

    ReplyDelete
  28. complimenti per il bellissimo blog. vorrei inserirti tra i miei amici ma non so come fare. Clementina

    ReplyDelete
  29. hi! i linked to this in my blog tonight, hope that's ok! i didn't have a quilling tool, and used a needle instead. it was a little tough, but i loved the result. i can't believe someone made over a thousand of these guys for her daughter's wedding! just thinking about that makes my fingers want to fall off!

    ReplyDelete
  30. Yes, BellsinSpires, perfectly okay to link to this page, thanks. Your roses turned out perfectly! I so agree... can't imagine making anywhere near a thousand!

    ReplyDelete
  31. Put a photo of your art and your website in my flickr album, making this much success. Congratulations very beautiful your work.
    Hugs
    Zilda

    ReplyDelete
  32. Beautiful rose and the tutorial makes it sound so easy. I can't wait to try it. Thanks for sharing!!!

    ReplyDelete
  33. I always have been frustrated doing folded roses, but this time, following your tutorial, it was really fun to make them up side down, they look really very nice. Then thank you for your tutorial.
    Francine

    ReplyDelete
  34. Thank you, Selen, that will be fine. Best wishes with your new blog!

    ReplyDelete
  35. I have been trying to figure out how to fold the quilled rose (that looks like a rose, not a red spiral. I'll try using you tutorial. Such a great tutorial by the way.

    ReplyDelete
  36. it luks really beautiful...and easy too...but i'll try and i 'll let u noe if it is so....!!!

    ReplyDelete
  37. I'm amazed on how you folded the rose..I normally do it the other way around and have never had a thought of doing it this way..Perhaps I should give a try in the future and see how it'll turn out to be..

    ReplyDelete
  38. cute! I've been wanting to make a paper rose wreath since I saw one in target. thanks!

    ReplyDelete
    Replies
    1. Nice idea, craft41. You can make roses any size you like just by widening/lengthening the paper. To join strips to make a longer one, tear the ends, then overlap a bit and add glue. That way the join will hardly show.

      Delete
  39. gratitude for this great tutorial, very pretty rose

    ReplyDelete
  40. Thank you so much for these easy to follow instructions, I've only recently started quilling but I already LOVE making roses, I try to include them in all my creations. I wish everyone would make their instructions as clear.
    P.S. I wish my winter ravaged hands looked as good as yours. Leah Huntley

    ReplyDelete
    Replies
    1. So sorry for my late reply, Leah, for some reason I missed it until now. Thank you, I'm happy you liked the tutorial. :)

      Delete
  41. Thank you so much for this tutorial! I have made roses for a card with it. My card is posted here and I've put a link to your tutorial for others to see.

    ReplyDelete
    Replies
    1. Thanks Cook, I appreciate that. Your roses are lovely.

      Delete
  42. So wonderful tutorial..thanks for the idea..

    ReplyDelete
  43. Okay ... I admit to being a non-conformist, but this day I was truly trying to make the perfect little rose along with this excellent tutorial. I got out my tape measure and cut 3/8" x 7" strips of paper and began rolling around a tiny vintage (Lee Wards 3) crochet needle. Folding as and when I should, I completed my rose ... but it did not look as it should. It was so wobbly. I thought, "Okay, it is the first one you've done~practice makes perfect." I read the success and failure (tri-corner hat effect, etc.) comments and the remedies for, but the more I tried the more imperfect my flowers were. THEN I decided to embrace the imperfection! I did all kinds of crazy things with those roses! Water colored (wet!) the paper, put Elmer's glue on my fingers and then rolled the rose, just nutty stuff, no pressure. Call it 'shabby chic', call it 'natural' looking, call it a Cabbage Rose. I will try to post the pictures when they dry.
    I could not have even began without the excellent tutorial. Thank you Ann Martin (also ♥ Polly Wiggins rose & frilled flower heart) for an excellent tutorial on perfectly formed roses.
    To those like me who didn't (I have never) achieved perfection, it's all good! Keep trying if you will. I will. But in the meantime, mistakes and imperfection can be quite lovely too.

    ReplyDelete
    Replies
    1. Hi Carole, I'm so glad you tried making roses and embraced the imperfections. Your comment is timely as just this past week - for the first time in a long time - I've been making roses and you know what? At first they didn't look as perfect as the one in this tutorial - so keep at it. They really do get better each time you return to try again. Just be the boss of that little strip of paper. :)

      Delete
  44. Have just found your blog and am so impressed with your tutorial for the rose.
    Have tried quilling in the past but due to loss of feeling in my fingers gave up. After seeing your easy to follow tutorial am encouraged to get my tools and bits out and have another try.
    Is there an easy way of printing off your tutorial?
    Many thanks for sharing your skill and you enthusiasm.
    Regards VC from the UK

    ReplyDelete
    Replies
    1. Hi VC, thanks for your message. I'm happy you feel inspired to give quilling a try again and I hope it goes well. Perhaps copy and paste the tutorial into a Word doc - that would be pretty quick and would avoid your needing to print out everything on the sidebar.

      Delete
  45. I don't have a slotted tool so used a bobby pin. It worked fine, made a pretty little rose out of just a 3/8 by 7 piece of tablet paper, thanks

    ReplyDelete
  46. years ago, I made folded roses in miniature to give as gifts at miniature club parties. I had forgotten how to make them and must have looked at dozens of tutorials until I found yours!! Such simple and easy to follow instructions got me past the fear factor! Thanks so much for your help in getting back on track!!!!

    ReplyDelete
    Replies
    1. I'm happy you found your way here, Linn, and it's wonderful to hear the tutorial was a help. Thanks for your comment.

      Delete
  47. Thank you for posting this. I'm sure it will save many of us several dollars. Happy Crafting this month EVERYONE!!

    ReplyDelete
  48. Hi excellent tutorial, wish I could do , One question, I don't have quilling tools and the paper , what can I replace it with, will definitely try , I love crafting
    Thanx

    ReplyDelete
    Replies
    1. You can cut strips of any lightweight paper, even computer paper. 3/8 inch or 1/4 inch are good widths. Some quillers don't use any tool other than their fingers to make folded roses, but you can start the rolling process by wrapping a strip end around any stiff wire a few rotations. A slotted tool is the easiest thing to use though, as the slots grips the paper for you.

      Delete
  49. Awesome tutorial Ann! Thanks so much for sharing...love your blog!

    ReplyDelete
  50. MsBage, I'm happy to hear that - thanks!

    ReplyDelete
  51. Wow beautiful rose...thanks for sharing ...lovely...I like. It

    ReplyDelete
  52. I'm glad you like it, Asha, thanks.

    ReplyDelete
  53. Woderful tutorial. I used it to make roses from tin cans, works perfectly!

    ReplyDelete
    Replies
    1. I'm glad you found the tutorial helpful, Patrick... thanks for letting me know. I bet your tin roses look great! I haven't tried that.

      Delete

Post a Comment

Thank you for taking the time to leave a comment. I try to respond to questions within 24 hours, so please check back.