10 New Ways to Think About Quilling

I noticed a myth-busting title on YouTube last week and had the thought that it would be fun to do something similar as a quilling topic. Let's start with the most frequently heard myth:

 quilled lightbulb design
Ideas Bulb
Yulia Brodskaya

1. Quilling is for grandmas.

Whenever I come across this statement, it's clear the person isn't in touch with the world of contemporary quilling. She or he needs to be introduced to the work of artists Yulia Brodskaya, Sena Runa, and Sabeena Karnik stat! In less than a decade, these young women have brought quilling to the forefront via their modern paper illustrations for advertisers and publishers. In addition, there are hundreds more quillers of all ages around the world who post photos of their own incredible work. Search for #quilling on Instagram and I think you'll be amazed.

quilled portrait of woman with artist looking on
Yulia Brodskaya viewing Pull to the Light

Gone are the days of predominantly sweet designs composed of traditional quilled shapes. The art now includes placement of on-edge linear strips that aren't rolled at all. In fact, Yulia has recently been pioneering the use of accordion folded strips that she inserts in block-like sections. For example, the colorful area surrounding the woman's eye in Pull to the Light and the portrait on the cover of her new book.

paper art portrait of woman on book cover

Wait, Yulia has written a book? Yes! Painting with Paper: Paper on the Edge will be released in September and can be pre-ordered now. "Brodskaya offers not a predictable project book, but instead practical tips on how to work with her method in various ways of your own."

colorful quilled unicorn
Believe in Magic
Sena Runa

2. If you don't know someone who can show you how to quill in person, you'll never learn.

Ouch, that's pretty harsh. There are actually quite a few ways to learn to quill and many quillers are self-taught. In an ideal world, your local craft store hosts classes where you'll have a good instructor to get you started. Your best bet though, is to learn at your own pace via YouTube videos, blog posts (browse quilling tutorials and quilled jewelry tutorials), how-to books, and craft magazine articles. Join online quilling groups where experienced quillers are happy to offer advice and answer questions. There are quite a few Facebook quilling groups; Contemporary Quilling is an active one.

quilling slotted tools

3. Quilling is expensive... it requires so many supplies.

Despite the fact that there are a mind-boggling number of quilling accessories - way more than even five to ten years ago - and some are quite handy, all you truly need are paper strips, paper craft glue, and a rolling tool (or even just your fingers). And once you start looking, you'll be amazed at the number of tools and materials you already have on hand around the house. It's a great hobby for budget-minded folks.

Excited to get started right away, my first tool was a cake tester from my kitchen drawer. What is that? It's a thin, stiff wire with a small loop on one end for grasping ease. Normally the tip is poked into a cake or muffin to determine if it has finished baking. However, any thin, stiff wire will work as a substitute quilling tool. I know one quiller who uses a long corsage pin. Often a wood toothpick or plastic cocktail stick is recommended, but I don't suggest going that route as they are too short to hold easily.

quilling tools and supplies
Long-handled tweezers, paper piercing tool,
Japanese slotted tool, metallic edge quilling strips

4. If you can't afford to order actual quilling strips, you might as well quit now.

Another myth! While most quilling strips are lovely to work with, available in a multitude of colors and definitely convenient, a sheet of printer paper cut into narrow strips can be used to decide if quilling is something you want to pursue, and later on, for practice. If you have access to a paper cutter to cut 1/8-inch or 1/4-inch strips, that's great, but if not, a pair of scissors will do... strips don't have to be perfectly straight for practice.

quilling needle tool
Rolling a quilling strip on a needle tool

In addition, many kinds of paper can be quilling alternatives. Junk mail, gift wrap, and greeting card envelopes are all fair game and produce interesting results. And if they don't roll well? Nothing is lost except the bit of time it took to experiment.

gluing quilling
Using long tweezers to touch quilling to a shallow glue puddle

5. If you want to be taken seriously as a quiller, you must use a needle tool.

I have to admit I believed this as a new quiller. And while it's pretty safe to say no one prefers the look of a quilled coil with a honking large center and the end doubled back on itself, small crimps that result from using a slotted tool barely affect the overall beauty of a design.

fine-tip glue bottle
Photo credit: Erin Curet of Little Circles

6. A fine-tip glue bottle is essential.

While most quillers use and love a fine-tip glue bottle, my method has worked well for me since I first learned to quill in 2002. I place a shallow dab of glue on a plastic lid and dip from it with the tip of a paper piercing tool or a ball head pin. These tools allow me to control the amount of glue, similar to using a fine-tip bottle, but without the repetitive squeezing motion. When the gluing session is over, the dab dries and can be peeled off the plastic and discarded.

quilling tools
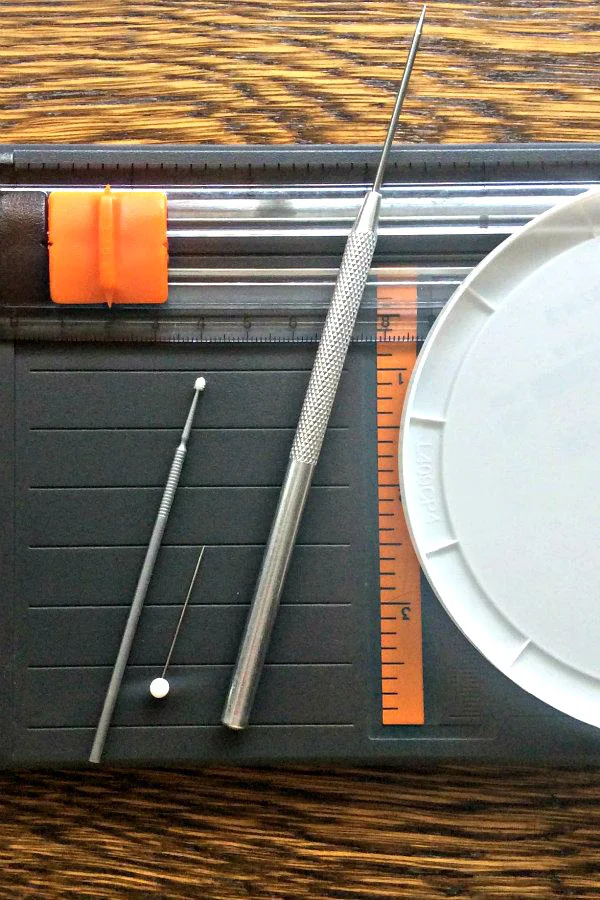
Paper cutter, micro-brush, glass head pin, paper piercing tool


7. You can't help but get glue on your background paper.

Oh contraire! The key is to remember less is more. Because paper is absorbent, the smallest amount of glue will secure the end of a coil or hold a completed piece in place on the background mat. If a drop of glue lands somewhere it shouldn't, think creatively... chance are good you'll be able to modify the design (i.e. hide the accident) so no one will be the wiser.

But what if your design is a minimalistic one and there is no way to add an extra coil? Or let's say excess glue has oozed out around a strip and left a shiny snail trail on your pristine paper? Immediately dampen the end of a tiny bristle brush - the kind used for model making - and sweep it along the strip's edges to collect glue on the bristles. Rinse and repeat ever so gently until the glue is gone, then place a tiny piece of dry tissue on the tip of your needle piercing tool and roll it lightly over the damp area to smooth the paper fibers.


quilling fixative
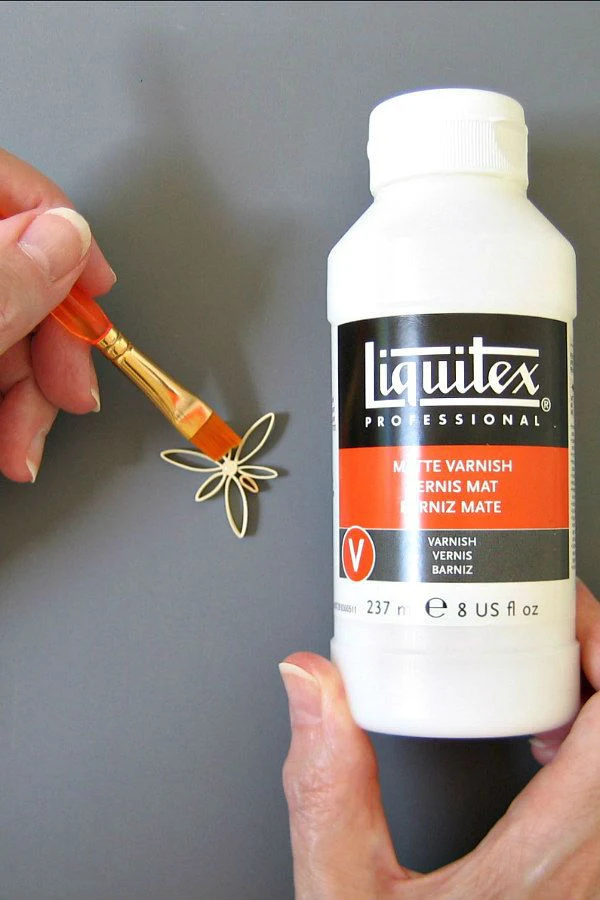
Brushing matte fixative on the reverse side of an earring

8. Applying varnish to a finished project is essential.

This is a touchy subject, but I bet we can all agree that for a framed quilled design behind glass, there is no need for a fixative. But even without glass, I'd argue for not using one... the piece will look more like true paper if it isn't coated with a plastic-like shine. Of course if quilling will be exposed to humidity (on a porch or in a bathroom, for example), then spray or brush on a couple of thin coats of a matte fixative and hope for the best. If you plan to make quilled jewelry, keep in mind that rings and bracelets are more likely to be splashed with water than earrings and necklaces.

9. Quilling is soooo non-stressful!

Okay, this is true in part. Like any meditative art or craft, there is no question that quilling can become a zen-like experience once you know how to do it. However, if you roll and pinch coils for hours at a time, you can be injured - just from sitting still! We get so in the zone we forget to get up and move... but you won't see the damage from doing this right away, perhaps not for years.

quilling needle tool with paper coil
Relaxed loose coil on a needle tool


A more immediate problem is repetitive stress injury to the hands. When I exclusively used a needle tool as a new quiller, I gripped it too tightly in order to achieve a perfect center... this led to tendonitis. Lesson learned! I took a break from quilling for a few months, then switched to a Japanese slotted tool (I like one that is available from Motoko (Maggie) Nakatani - the coil centers it produces are tiny), and made sure to quill only for short periods and to do hand stretches periodically while quilling. Read about choosing a slotted quilling tool, including the type sold by Maggie via Etsy shop Quilling Maggie.  


[EDIT March 2023: Motoko is still shipping the super-fine quilling tool worldwide, but Covid continues to cause delays. Rather than shipping via her Etsy shop, she can be contacted directly and will ship a tool via EMS to the U.S. for about $28. Alternatively, less expensive regular airmail has been taking about one month and does not include tracking or insurance. Contact Maggie at info@e-bison.co.jp to place an order.]

quilled necklaces
Necklace designs in my how-to quill books

10. It is totally wrong to copy someone else's design.

Nope, designs that are found in how-to books, magazines, and kits are most definitely intended to be copied. This, after all, is how a person learns to quill. What is totally wrong, however, is to take credit as the designer or to sell these items if permission isn't specifically granted in the text or by contacting the original designer to ask permission.

Now that we have all these myths cleared up, it's time to spring into action...

quilled illustration
Spring into Action
Sabeena Karnik for Houstonia Magazine, March 2019

...and have fun with quilling! Can you think of other quilling myths?

There are more quilling tips here: Quilling Frequently Asked Questions and you'll find my recommended quilling supplies here: Amazon shop.


All Things Paper is an Amazon and Etsy affiliate.
This post contains affiliate links. If you make a purchase, 
I will receive a small commission at no additional cost to you. 


Ann Martin
Ann Martin

This is a short biography of the post author and you can replace it with your own biography.

Comments

  1. My friend used a large needle with an eye, sawed off the top quarter of the eye, and used a bit of sandpaper just to smooth sharp edges. The pushed the needle into a dowel. Voilá! A quilling tool!

    ReplyDelete
    Replies
    1. Yes! That will work. I know someone who uses hair perm rods (if you can find them) as a handle... she heats them a bit, then pushes in a fine needle.

      Delete
  2. Thank you Ann for this post. I use hair comb as comb tool. Ive just begun to quill and don't use glue bottle n all. I thought its essential n was about to give up quilling. Your post helped me ease up n understand that its ok not to have myriads of tools to quill.

    ReplyDelete
    Replies
    1. Dipa, I'm so glad my words helped you. Lots of tools and supplies truly aren't necessary.

      Delete
  3. I love this post! I learned to quill on my own. I mostly work with my hands to coil, though I bought some very fun tools recently to use. I've quilled for about 5 years, and work only from pictures and not from instructions. This makes it a bit difficult to learn new techniques, but I think that it makes it more fun. I use mod podge to seal my crafts.
    Thanks for the post, Ann!

    ReplyDelete
    Replies
    1. You're welcome, Amanda, I'm glad you enjoyed it. Happy quilling!

      Delete
  4. I was looking for a craft when I retired. Needed to be reasonable in price as some can get out of hand financially and it needed to not take up too much space as we chose to live in an RV. I saw quilling on Pinterest and didn't take long to try it and decide this was it. I cut my own paper, lots of colours available and tools and combs, etc are easy to find. I am not creative but I can copy almost anything. I have enjoyed it immensely for 6 years now and am still enthusiastic to start a new project. Have made many ornaments for my kids trees and grandbabies.

    ReplyDelete
    Replies
    1. Quilling is a fantastic hobby in lots of ways, you are right... it doesn't take up much space, supplies are inexpensive, and I love how relaxing it is too. I'm so glad it found you. :)

      Delete
  5. I am a school teacher in one of the international school i did lots article like greetings cards, paper jewellery for my school special days my head of school Dr.tooher Hancock principal she is was wery happy i have learn my own i am recycling the waste paper

    ReplyDelete
  6. Thank you for your article:)
    I just would like to add that I sometimes make my own strips by using a paper shredder. The strips aren’t as long but easy to glue end on end when necessary.

    ReplyDelete
    Replies
    1. You're welcome and yes, using a paper shredder can work just fine. Thanks for the suggestion.

      Delete
  7. The Serial QuillerMay 14, 2023 at 3:59 PM

    Wonderful article thank you 😊

    ReplyDelete
  8. The comment about it’s expensive hobby but later on you can use household items or anything!
    I’m very creative, can literally turn my hands to anything creative & I go deep, I don’t want start at beginning 🤦🏽‍♀️😂, straight to mission impossible with no knowledge 🤣 NOBODY: … ME: watches x,y,Z 💭 if they can, I can , don’t follow instructions 🤣 but arggh hate my perfection side,HAS 2BE BEST I *CAN DO!!
    But my comment was, guess where me at 37 found (kinda of) quilling.. In HMP yes prison.. An elder women was crafty, cell like a nursery craft/playroom 😂🤣 she loved them & I loved my crochet blanket 🥰
    ME: Nosey woo what’s that?
    ELDER: quilling, you roll paper!
    **ONLY** info/knowledge I had..!!
    Library day: ME: 👀 quilling.. NOPE 👎🏽
    1 thing in my favour I’ve abundance of time, 2, natural gifted with creativity 3: VERY resourceful character!
    💭……
    * Went to mental health craft group (entered size B breast, left like Dolly Parton & like a magician upon entering my cell 😂🤣
    (Pulling ribbon,after ribbon 🤡, every size colour buttons, wool,toy stuffing, sewing needles, knitting needles, crochet, every shade in every colour of silk threads, cross stitch fabric, blank cards, patterned paper, every shades of coloured paper, All colours A4 card, goggles eyes, mini pegs, bows, anything cute/tiny (still have a Stewart little sized metal coat hanger never used😂)
    They was NOT anything I didn’t have 😆
    My advantage *ONLY* I had ‘ANY’ craft stuff, in WHOLE prison & the natural creative skills required & richness of time on my hands!!!
    Me: IM GONNA MASTER QUILLING 😭🥸
    💭
    * my tools & supplies
    1) Needle 🪡 CUT TIP OFF with toe nail clippers & make & add a handle(2prongs=. Quilling tool) ✅
    2) *Wink*Wink* Inmate handing razors out, get extra (favour 4 favour)
    Break razor’s remove tiny blade.
    3) Blade, paper,ruler: sat cut millions of 4mm pieces quill paper.
    & away I were!!!!
    7years & in my cell creating my time flew,Infact I’d hate in middle of project with like 4 storage boxes of supplies & projects out& officers open cells up for ‘playtime’ 😆 as I’d have a gathering of…OMG CAN I HAVE or where u get that, can u show me blah blah blah…
    I had NO FAMILY so self- supported (I mean I got my arse there,why should ppl pay & send me cash in🤷🏽‍♀️)
    I made a VERY good business, booked up 6mths in advance with orders…
    I’d make matchstick frames for them or box frames, always had my signature mark.. Added a button saying 💝HANDMADE WITH LOVE💝
    Entered my collection of Quilling critters, Animals,& ppl to an Annual competition events across the whole UK prisons. Hardman Awards, huge deal (especially in male Hmp’s & loads of categories)
    No officers where I was had NEVER HEARD OF IT nevermind had any1 entrée before nor aided to send entries etc…
    Craft section was tiny😬 I WAS the needle in the haystack BUT I WON 🏆 BRONZE !!!

    Apologies 🫢 I waffle on!
    & *IF* anyone reads this Thankyou for your time & Stay Blessed 🫶🏽

    ReplyDelete
    Replies
    1. Anon, I'm so glad you found quilling... it sounds like it's brought a lot of goodness into your life.

      Delete

Post a Comment

Thank you for taking the time to leave a comment. I try to respond to questions within 24 hours, so please check back.