Wednesday, October 28, 2009

Pop-Up Paper Art - Half a Cup of Tea

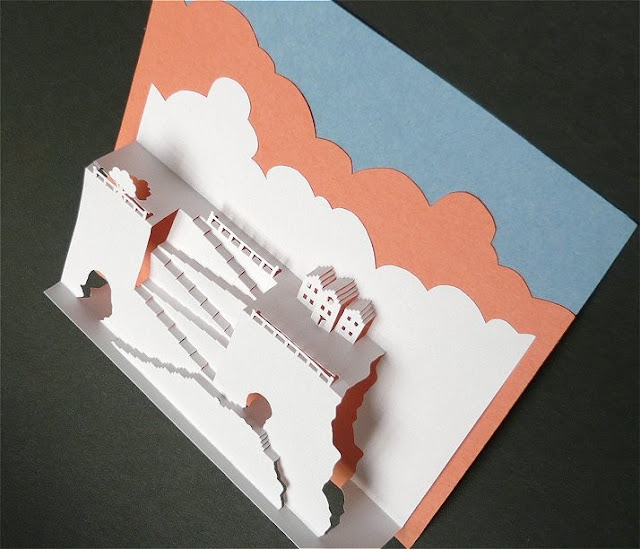
Glory of Hong Kong has long been fascinated with pop-up construction. She set about learning how to do it by studying instruction books and paper engineering tricks. Obviously, hard work pays off... just look at the detail she cut and folded into this little scene. Altitude series: Mansion on Cliff

I love the story of how Glory decided to make miniatures her specialty... after practicing for hours on end and using loads of scrap paper, she noticed her cuts were becoming smaller and smaller in order to save paper. She wisely realized this gave a unique quality to her designs and has kept it as her signature style.The idea for adding the LED lighting that casts such a wondrous glow came about by accident. One evening after practicing, she set the paper cut she'd been working on upon her scanner. In the darkened room, the blue scanner light beautifully brought the illuminated cut-out to life.Altitude series: Mountain Village

Mountain Village is her most difficult cutting to date, but also her favorite. It's a detailed fairyland of many tiny houses with windows; some have doors and even doorknobs. There are also mountains, a rising moon, a church, birds, and 99 steps! Except for the moon, the entire sculpture is constructed from a single piece of paper.To give you an idea of just how tiny these scenes are, Ahoy Matey measures all of 3 inches x 3 inches with a 1.6 inch depth. Table for Two series: Ahoy Matey

Visit Half a Cup of Tea to see more of Glory's miniatures.

Monday, October 26, 2009

Benagami and Makigami - Benjamin Coleman

Several years ago Ben Coleman of Rhode Island was gifted with an origami book that changed his life. He had found success in the business world, then turned to teaching math as a creative outlet, but felt something was missing. Benagami silk technique pink columbine in Makigami pendant

The book brought back memories of a favorite childhood pastime, making origami Christmas decorations with his father. Once again Ben found himself enjoying the process of folding paper, all the while marveling at the dual aspects of complexity and simplicity.Benagami Shadowcaster origami windswept bonsai tree

Ever since accidentally creating an original, perfect flower from an origami eagle pattern in 2006, Ben has been devoted to making bonsai botanical sculptures from recycled paper... he calls them Benagami. Shadowcaster close up

Ben sells his creations via Etsy and he's put his teaching skills to use by writing Origami Bonsai, a how-to manual, so anyone can learn to make beautiful origami floral arrangements. (Tuttle, April 2010 release)

Ben's invention of Makigami is especially intriguing... it means roll-paper in Japanese and is the technique he enlists to make bonsai branches. Newspaper is soaked in a water-based mixture and then rolled into stems. When dry, the stems are assembled as branches, painted, and adorned with flowers and leaves. Benagami/Makigami teardrop ornament

Makigami works just as well for other items too, such as his curved pendants, ornaments, and these stylish napkin rings... and bracelets, which can even double as drapery tie-backs! But Ben has another use in mind for Makigami that's especially fascinating. If you're like me and think sadly about the number of plastic objects we repeatedly throw away, Ben demonstrates via a video that manufacturing disposable items, such as pens, razor handles, and toothbrushes of Makigami, would save a tremendous amount of natural resources.A Makigami pen decomposes within three months of being discarded, whereas a traditional plastic pen takes 450 years! And it requires just 1/10 the energy and 1/1000 the petrochemicals to make, in comparison to the plastic model. Considering over 100 billion plastic pens are manufactured annually, Makigami pens certainly sound like a win-win solution.
Visit Ben's site for more information.

Thursday, October 22, 2009

Fog and Thistle Giveaway

Rachel Weber of Fog and Thistle, who makes the wonderful, hand-cut night lights I posted about a few weeks ago, is celebrating her Etsy shop's second anniversary with a night light giveaway.For a chance to win, visit Rachel's shop and then leave a comment on her blog by Saturday night at midnight, naming your favorite light design. This Koala Love design happens to be my fave... in the daytime Momma Bear is alone, but at night she's magically joined by her cub. Cute!

Wednesday, October 21, 2009

Quilled Bird Pendant

Thanks to inspiration from my Twitter friend, Sharon Bennett, I created a bird pendant to wear this fall.But more about the bird in a moment... first I'd like to introduce you to Sharon, an illustrator who creates template books for David and Charles, and designs projects for UK craft magazines. Not only does she draw and paint beautifully, Sharon has a most generous spirit: all of the original designs on her blog, Steady On!, may be grabbed and printed for personal use in card making or any other paper crafting pursuit.
If you like to quill, I think you'll find that many of Sharon's designs are perfect for rolled paper interpretation.Perhaps you've noticed the popularity of bird graphics lately. They're fluttering about in so many places... on stationery, invitations, print ads, you name it. Well then... Sharon's blog entry on September 4 caught my eye. Dear, swirly little birds! I had a feeling she wouldn't mind if I tried my hand at quilling one, but I emailed to ask. Happily, Sharon was excited about the project and loved how the bird turned out. If you would like to make a necklace of your own, here are a few tips to get you started:
In order for the paper to be sturdy enough to retain the outline, begin by gluing several strips of gilded-edge quilling paper together, one on top of the next. When the paper stack is completely dry, (otherwise it will buckle) use your fingers and the handle of a quilling tool to shape the outline. Then just add rolled teardrop coils for the wing, headdress feathers, and tail feathers. There! Something new to wear tomorrow.Bronze colored satin cording makes a quick and easy necklace. Finish it off with an adjustable sliding knot.

(Brand new to quilling? This tutorial covers the basics. And here are more pendant ideas.)

Monday, October 19, 2009

Slash: Paper Under The Knife

click for close up view... it's amazing to think her attire is all paper.

Eloise Corr Danch has done it again! Ruffian Paper Doll 2009 is an extraordinary historical costume sculpture she created for the opening gala of Slash: Paper Under The Knife, a new exhibit at New York City's Museum of Arts and Design.

From Eloise's site: For this sculpture I used many pages of the book Ruffian: Inside Out (Assouline). Her bustle features pictures of Brian Wolk and Claude Morais designing the collections, as well as images of their prints, inspiration reference, sketches and the lovely models who illuminate Ruffian's silhouettes. The stripe pattern was made by cutting up quotes from the book and reassembling them in a pinstripe pattern which was then draped into her skirting. Her bodice features a 2 layer floral pattern that I illustrated and then cut through. She has a trademark Ruffian lace collar, lace cuffs, and a floral hat with feather detail. Her body is covered in LeMonde newspaper.

To learn more about Slash: Paper Under The Knife, which features paper that's been burned, torn, cut, and shredded, there's a terrific short video here. The exhibit runs through April 4, 2010.

Friday, October 16, 2009

Quaker Marriage Certificate (deux)

Perhaps you remember a previous post about the Quaker Marriage Certificate I quilled for a former student and her fiancé. Well, what a nice surprise... an engaged couple came across that entry this summer, liked what they saw, and emailed to ask if I would create a certificate for their September wedding. Of course!(click pics for close ups)

Elizabeth and Bill commissioned calligrapher Carole Foster to letter their document. Not only did Carole do an incredible job with the script, she also embellished the header with a graceful flourish of doves.Liz and Bill requested I quill a similar design to the one I'd created for the first certificate, but with black filigree. Ordinarily I prefer to quill a different motif for each project, so even though I went with a similar curved design, I altered some of the floral elements. I also suggested adding a bit of silver-gilded black paper to heighten the dramatic effect, showing them examples of paper filigree done in black with silver accents. When the certificate was shipped, I included a provenance paper... if you aren't familiar with this practice, it's an artist-signed document that can be kept with the art work or separately. It tells when and where the piece was made and by whom, and gives a brief description and materials used. I also like to include a short history of paper filigree. A provenance paper is a simple touch that makes what may someday be an heirloom piece that much more valuable.Recently Elizabeth forwarded pictures of the wedding to me. How nice it was to see photos of the guests adding their signatures to the lines Carole had penciled below the wording.

Best wishes, Elizabeth and Bill!

Wednesday, October 14, 2009

Liz Hamman - Paper Jewelry and Book Origami

I was first introduced to the inventive paper art of Liz Hamman via a Twitter link that took me to her Flickr page. Why Liz's work isn't well known is beyond me, but I'm positive it's only a matter of time... take a look and I think you'll agree: black and graphite origami necklace

Liz says she's inspired by geometry, growth patterns in nature, and repetitive structures and processes. refolded map brooch

What first attracted you to begin working with paper as your medium?

I began working with paper when I was at college. I find it to be exceptionally versatile as a material and if a mistake is made, it's not expensive to replace and, of course, paper is ecologically sound. Artist's books - the book as an art form in its own right - interested me, especially sculptural ones. The paper jewellery came directly from this interest. I consider some of the necklaces I make to be sculptural Artist's Books as they are complete books.folded book necklaceZipporah necklace

Have you always enjoyed working with your hands?

Yes, always. Paper is fantastic as it's so direct, your only tool is your fingers. I also find the whole process of making to be very therapeutic and almost what I imagine meditating to be like.manga water balloon necklace

Have you studied design and/or does your sense of creating and style come to you naturally?

I studied art when I was younger and then as a mature student, I went back to college in the town where I live (Macclesfield, Cheshire, England) to study at a higher level. I earned a diploma in Fine Art which took me three years part-time. I think I've always been pretty okay at art and design, but I feel doing a diploma made me better.refolded map bracelet

Are you, or would you like to be, a full-time artist?
I would love to be a full-time artist although I do enjoy my normal day job too. It's good to have a definite reason to get away from my art work as it gives me time to think where to take it next. I don't have a very taxing day job and luckily it's only part-time. I think being an artist who works alone at home might be a bit lonely. Having said that though, I would love to give being a full-time artist a go. music beads
Dandy comic book necklace

Do you show/sell your work in galleries?

At present my jewellery is sold in local galleries and through the art group I belong to. I have also sold to people who have contacted me by email (liz.hamman at googlemail dot com) who have seen my work on Flickr. I was contacted by the National Glass Centre in Sunderland earlier this year who put some of my work in their showcase; I sell with them now, too. I don't have an online shop yet, but plan to get that sorted out early in the New Year. folded book
origami folded book

Do you frequently wear your
own paper jewelry? How do people react to it?
Yes, I do wear my own jewellery, but normally only if I am going out. People are usually very complimentary about my work, although there have been a few people that really don't like the idea of me cutting up maps. I hasten to say all the books and maps I create with have been read/used... I never cut new ones!Japanese brocade origami beads Bangle made from The Ladybird Read It Yourself series, Goldilocks & the Three Bears.
Monopoly money brooch

Tuesday, October 13, 2009

Fun Stuff

A couple of links today I'm pretty positive you'll enjoy. First off, thanks to notcot.com for alerting the blogosphere to the front and back covers of this year's Neiman Marcus Christmas Book. This department store always delivers the finest style, so it's no surprise they're right on target by spotlighting the phenomenal work of paper filigree expert, Yulia Brodskaya. (featured previously here) And if you care to page through the entire catalog, there's even a section titled, A Storied Approach, that features the use of folded newspaper hair ornaments and clothing. (pp 60-70)

And then, over at The Beading Gem's Journal, sign up to enter the giveaway of nifty folded paper earrings made by Papermode. (also featured here)While you're visiting, be sure to click on the links about the number of times a piece of paper can be folded in half. Can't say it's something I'd ever considered until this morning, but obviously many other people have put a great deal of thought into it!

Monday, October 12, 2009

Halloween Spider Frame Tutorial

Boo! Want to learn how to make this creepy - and dare I say it?! - realistic spider, to decorate a picture frame?It's not hard at all, trust me... step-by-step instructions make it a project you can complete in an evening.Supplies:

Quilling paper - 1/8 inch - black, orange
Quilling tool - needle tool or slotted tool, whichever you prefer.
(Read more about choosing a tool, and how to use each type, here.)
Glue - any kind that's suitable for paper
Scissors - detail
Ruler

Tweezers
Paper piercing tool or T pin
Glass head pins
Plastic lid - to use as a glue palette
Non-stick workboard - cork, Styrofoam, waxed paper over foam core board (something into which you can stick pins)
Damp cloth - to keep fingers free of glue
Photo frame - paper mache
Mulberry paper - orange
Glue stick - to adhere mulberry paper to frame
Buttons - pumpkin, 2
Pliers - to snap shanks off buttons

Spider Instructions:
1. Body: Roll a 24 inch strip of black paper on quilling tool. Glue torn end (a torn edge blends best) and slide this tight coil off tool. Use the end of tool or a fingertip to press against one side of the coil to give it a rounded shape. Pinch this domed coil between thumb and index finger to form an oval. Apply glue to underside to preserve curve.

2. Head: Roll a 10 inch strip and proceed as for body, making a domed tight coil. Glue head to body.

3. Legs: Make 4 pairs of legs - two short pairs (4 loops) and two long pairs (7 loops)a. Begin by making a 1/8 inch fold at one end of a black strip.
b. Make a loose loop around the fold, larger than the first loop, encircling it.c. Holding loops at bottom, continue wrapping strip to create more loops, making each one about 1/8 inch taller than the previous loop.
d. Glue strip at bottom and cut off any excess.e. Hold at glue join and slide thumb and index finger of opposite hand along sides of loops, pinching them to form a narrow 'leg' column.

f. Bend leg and glue to side of body as pictured. (Tweezers are essential when handling small parts.)

4. Eyes: (make 2) Make a 2 inch black, domed tight coil. Pinch into oval shape. Glue on head.

5. Antennae: (make 2) Follow directions as for legs (2 loops). Curve and glue on head between eyes and front legs.

6. Marquise: Cut a 4 inch strip of orange quilling paper lengthwise in half. Roll one of the strips; allow coil to expand, slide it off tool, and glue end. Pinch at two opposite points to make a marquise shape. Center and glue marquise on spider's back.(Awww, this photo of youngest son (years ago!) is one of my favorites. He loved wearing the pumpkin costume I'd made for him.)

Covered frame instructions:
A paper mache frame is inexpensive and can be found at any big box arts and crafts store. To cover it, separate the front from the backing and coat front surface with glue (glue stick is easiest). Next, apply a sheet of orange mulberry paper and fold the corners around to the back as if wrapping a package.

For the oval photo area, make a slice through the mulberry paper that covers the oval and trim away all but a half inch of paper that extends beyond the oval margin. Make cuts every inch or so around the oval, perpendicular to the frame, forming tabs. Fold these tabs to the back of the frame front and glue them in place. This gives the edge a finished look. Then glue the two frame parts back together, laying a heavy book or two on top while the glue dries completely.Spider web instructions:
The web is made of black quilling strips. For the cross pieces, trim the ends with scissors to give a curved effect. Glue each strip on the frame referring to the picture. Use either liquid glue or a glue stick... this can get a bit messy, so keep a damp cloth handy to wipe your fingers. If you get some glue on the front of the strips, fear not... simply wipe off with the cloth before the glue has a chance to dry completely.

Holding spider with tweezers, dip its underside in a glue puddle you've spread on a plastic lid. Place it where desired on the web.

Final step - buttons:
Cut shanks off two little pumpkin buttons so they'll lie flat and glue them on the right side of the frame.