Quilling 101: Basic Flower and Leaf Tutorial for Beginners
Long-time readers might remember these two quilling 101 projects I originally created for the Inspired Bride website. I've updated/simplified my instructions to show you exactly how to create the most basic quilled flower with leaves... pretty on place cards and favor boxes.

Even if you've never quilled before, you'll find everything necessary to get started within this post - consider it Quilling 101. If you have questions, ask them below in the comment box and I promise to answer. Also visit my Quilling FAQ page where you'll find even more information.

Quilling Supplies:
Quilling paper - 1/8 inch (3 mm) standard width
There are two types of quilling tools - needle and slotted. A needle tool is not as simple to learn to use as the slotted variety, but the coils a needle tool produces will have no center crimp.... the choice is yours. If you’re new to quilling and plan to make many flowers, a slotted tool will be easier on your hands. The slot grabs the paper and holds it while you turn the tool. Look for one with an ultra-fine slot, as it will make a less noticeable center crimp than a standard slotted tool.
Note: Quilling paper and tools are quite inexpensive and you'll find the best selection via online suppliers. Craft stores generally stock very few paper/tool choices. Impatient to get started quilling immediately? Cut a sheet of printer paper into narrow strips and practice rolling coils on any stiff wire you have on hand. I learned to quill using a cake tester from my kitchen drawer. Some quillers prefer to use only their fingers - no tool at all! - because it eliminates the tiny hole in the center of a coil. No matter which method you use, you'll feel all thumbs at first... I guarantee it gets better with practice.
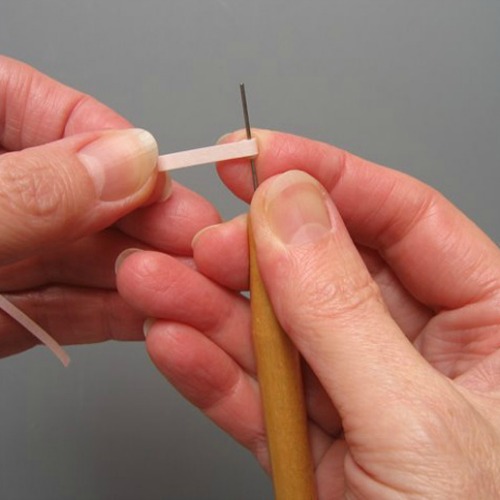
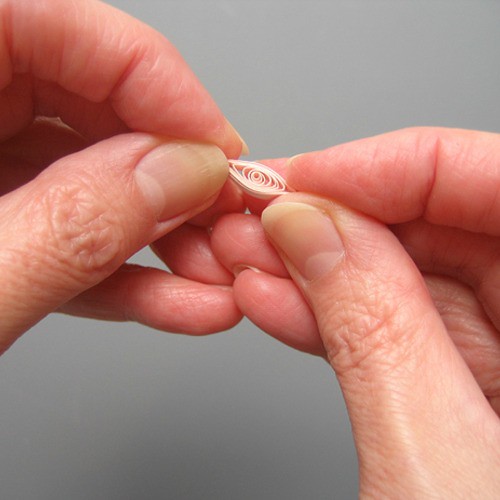
To roll a coil with a needle tool: dampen fingertips and curve the end of a strip across the needle. Use the thumb and index finger of whichever hand is most comfortable to roll the paper on the needle using even pressure. Be sure to rotate the paper, not the tool.
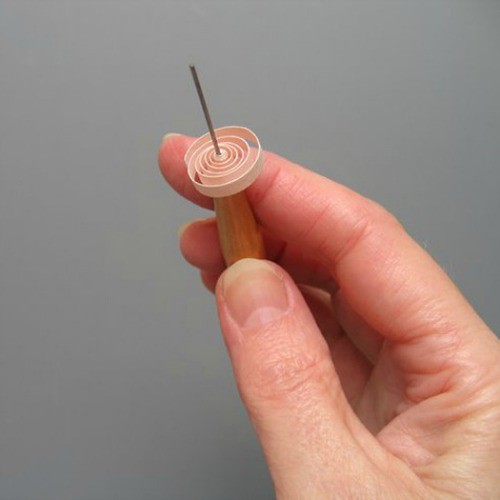
When the end of the strip is reached, allow the coil to relax and slide it off the tool.

To roll a coil with a slotted tool: slide the very end of a strip into the slot. Turn the tool with one hand while guiding the paper with the other. Allow the coil to relax and slide it off the tool.
Gluing Tips:
My favorite gluing method is to spread a shallow puddle on the surface of a plastic container lid. Apply a controlled/small amount with a T-pin, toothpick, or the tip of a paper piercing tool. There are also soft plastic, fine-tip applicator bottles available from quilling suppliers that can be filled with glue.

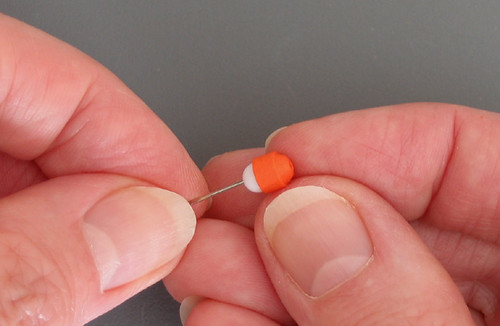
To make a domed tight coil (flower center): roll strip on tool, but don’t allow it to relax. Apply a small amount of glue to the end, hold in place for a moment while the glue adheres and slide coil off tool.
Tip: when making a tight coil, a torn strip end is smoother/less obvious than one that has been cut.
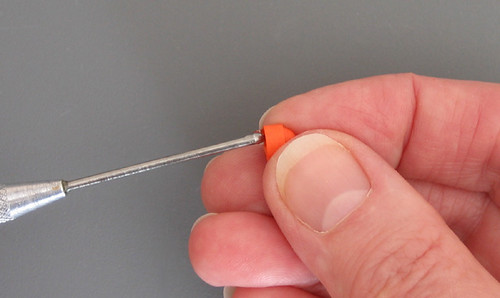
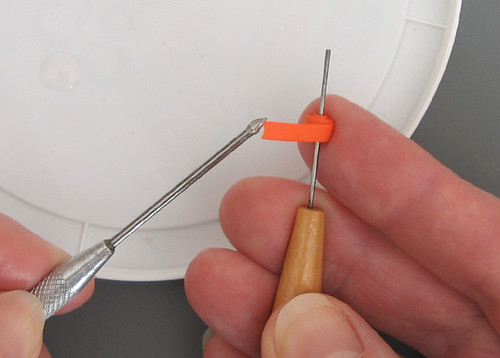
Press against one side of the tight coil with the head of a pin to create a domed top. Apply a thin coating of glue inside the dome to preserve the shape.
To make a shaped marquise (leaf): the process is similar to a teardrop, but pinch opposite sides of the coil to create two points. Gently curve one point up and the other down to create a leaf shape.
Work on a non-stick surface, not directly on your place card or favor box - less chance for errant glue drops.

Large Flower (for place card): make six 6-inch (15 cm) teardrops and one 2.5-inch (6 cm) domed tight coil
Small Flower (for favor box and place card): make six 4-inch (10 cm) teardrops and one 2-inch (5 cm) domed tight coil
Assemble flowers:
a. Apply a small amount of glue to one side of a teardrop and adhere it to another. Continue until the flower has six petals with points facing inward.
b. Glue a domed tight coil to the center of the flower - to do this, hold coil with tweezers and touch underside to a shallow glue puddle, then place directly on the flower.
Leaves: make an assortment of shaped marquises using 3, 4, and 5-inch (7.5, 10, and 12.5 cm) strips
Tip: Some quillers use straight pins to hold quilling in position on a cork board or Styrofoam while the glue dries, but honestly, I don't find this necessary. No pins means you can easily adjust the petals while the glue is setting. Also, if you have used so much glue that your flower is stuck to the work board when dry, use less in the future... it takes a surprisingly small amount.
Place Card Supplies:
Card stock
Adhesive label or paper/printer
Paper trimmer with scoring and cutting blades
Glue stick
a. Cut, score and fold a 3.5 x 5 inch (9 x 12.5 cm) piece of card stock to make a tent card.
b. Adhere a 3 x 2 inch (7.5 x 5 cm) piece of colored card stock to card front using a glue stick.
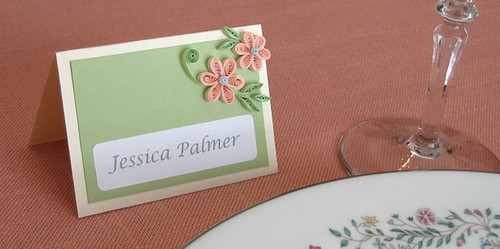
c. Glue one small and one large quilled flower on upper right corner. Add leaves. To do this, hold flowers/leaves with tweezers, one at a time, and touch underside to glue puddle, then place directly on place card.
d. Make a loose scroll by rolling a 2.5-inch (6 cm) strip of paper. Allow it to relax and slide it off the tool. Hold coil with tweezers, touch it to glue puddle and position as shown with curved end positioned between two petals.
e. Print and apply adhesive label or print and cut label with a paper trimmer and adhere with glue stick.

Favor Box Supplies:
Favor box - pre-scored, example measures 3 x 3 x 2 inches (7.5 x 7.5 x 5 cm) - foldable boxes are available at big box craft stores or online
Card stock
Adhesive label or paper/printer
Organza ribbon - .75 inch (2 cm) width
Glue stick
a. Assemble box.
b. Cut a 2.5 x 2.5 inch (6 x 6 cm) piece of card stock. Use glue stick to adhere it to box top.
c. Glue a large quilled flower on upper right corner of card stock.
d. Glue leaves as shown.
e. Print adhesive label or print and cut with a paper trimmer and adhere with glue stick.
f. Fill box and tie with ribbon.
While it might seem overwhelming to create the number of boxes and place cards required for a wedding, try making just one or two flowers a day. Quilling is something that simply can't be rushed... just enjoy the process.


Quilling paper - 1/8 inch (3 mm) standard width
Quilling tool - needle tool or slotted tool
Glue - any type that is suitable for paper. I prefer to use a clear gel adhesive because it doesn't develop a 'skin' the way white glue does.
Scissors - detail
Ruler
Tweezers
T-pin, toothpick, or paper piercing tool - to apply glue
Glass head pin - to shape flower center
Plastic lid - use as glue palette
Non-stick work board - Styrofoam or cork. I like to use an overturned grocery store meat tray - washable/disposable
Wet wipe - essential for keeping fingers glue-free
(More paper craft products I recommend can be found in my Amazon shop)
There are two types of quilling tools - needle and slotted. A needle tool is not as simple to learn to use as the slotted variety, but the coils a needle tool produces will have no center crimp.... the choice is yours. If you’re new to quilling and plan to make many flowers, a slotted tool will be easier on your hands. The slot grabs the paper and holds it while you turn the tool. Look for one with an ultra-fine slot, as it will make a less noticeable center crimp than a standard slotted tool.
Note: Quilling paper and tools are quite inexpensive and you'll find the best selection via online suppliers. Craft stores generally stock very few paper/tool choices. Impatient to get started quilling immediately? Cut a sheet of printer paper into narrow strips and practice rolling coils on any stiff wire you have on hand. I learned to quill using a cake tester from my kitchen drawer. Some quillers prefer to use only their fingers - no tool at all! - because it eliminates the tiny hole in the center of a coil. No matter which method you use, you'll feel all thumbs at first... I guarantee it gets better with practice.
needle tool
To roll a coil with a needle tool: dampen fingertips and curve the end of a strip across the needle. Use the thumb and index finger of whichever hand is most comfortable to roll the paper on the needle using even pressure. Be sure to rotate the paper, not the tool.
When the end of the strip is reached, allow the coil to relax and slide it off the tool.
This is a regular slotted tool. The one shown in the Supplies photo is ultra-fine.
To roll a coil with a slotted tool: slide the very end of a strip into the slot. Turn the tool with one hand while guiding the paper with the other. Allow the coil to relax and slide it off the tool.
Gluing Tips:
My favorite gluing method is to spread a shallow puddle on the surface of a plastic container lid. Apply a controlled/small amount with a T-pin, toothpick, or the tip of a paper piercing tool. There are also soft plastic, fine-tip applicator bottles available from quilling suppliers that can be filled with glue.
To create the flower used in these projects, you will make teardrops for the petals, a domed tight coil for the center and shaped marquises as leaves.
To make a teardrop (petal): roll the strip and allow it to relax. Slide coil off tool, pinch a sharp point, glue end and trim excess paper.
To make a domed tight coil (flower center): roll strip on tool, but don’t allow it to relax. Apply a small amount of glue to the end, hold in place for a moment while the glue adheres and slide coil off tool.
Tip: when making a tight coil, a torn strip end is smoother/less obvious than one that has been cut.
Press against one side of the tight coil with the head of a pin to create a domed top. Apply a thin coating of glue inside the dome to preserve the shape.
To make a shaped marquise (leaf): the process is similar to a teardrop, but pinch opposite sides of the coil to create two points. Gently curve one point up and the other down to create a leaf shape.
Work on a non-stick surface, not directly on your place card or favor box - less chance for errant glue drops.

Small Flower (for favor box and place card): make six 4-inch (10 cm) teardrops and one 2-inch (5 cm) domed tight coil
Assemble flowers:
a. Apply a small amount of glue to one side of a teardrop and adhere it to another. Continue until the flower has six petals with points facing inward.
b. Glue a domed tight coil to the center of the flower - to do this, hold coil with tweezers and touch underside to a shallow glue puddle, then place directly on the flower.
Leaves: make an assortment of shaped marquises using 3, 4, and 5-inch (7.5, 10, and 12.5 cm) strips
Tip: Some quillers use straight pins to hold quilling in position on a cork board or Styrofoam while the glue dries, but honestly, I don't find this necessary. No pins means you can easily adjust the petals while the glue is setting. Also, if you have used so much glue that your flower is stuck to the work board when dry, use less in the future... it takes a surprisingly small amount.
Card stock
Adhesive label or paper/printer
Paper trimmer with scoring and cutting blades
Glue stick
a. Cut, score and fold a 3.5 x 5 inch (9 x 12.5 cm) piece of card stock to make a tent card.
b. Adhere a 3 x 2 inch (7.5 x 5 cm) piece of colored card stock to card front using a glue stick.
c. Glue one small and one large quilled flower on upper right corner. Add leaves. To do this, hold flowers/leaves with tweezers, one at a time, and touch underside to glue puddle, then place directly on place card.
d. Make a loose scroll by rolling a 2.5-inch (6 cm) strip of paper. Allow it to relax and slide it off the tool. Hold coil with tweezers, touch it to glue puddle and position as shown with curved end positioned between two petals.
e. Print and apply adhesive label or print and cut label with a paper trimmer and adhere with glue stick.

Favor box - pre-scored, example measures 3 x 3 x 2 inches (7.5 x 7.5 x 5 cm) - foldable boxes are available at big box craft stores or online
Card stock
Adhesive label or paper/printer
Organza ribbon - .75 inch (2 cm) width
Glue stick
a. Assemble box.
b. Cut a 2.5 x 2.5 inch (6 x 6 cm) piece of card stock. Use glue stick to adhere it to box top.
c. Glue a large quilled flower on upper right corner of card stock.
d. Glue leaves as shown.
e. Print adhesive label or print and cut with a paper trimmer and adhere with glue stick.
f. Fill box and tie with ribbon.
While it might seem overwhelming to create the number of boxes and place cards required for a wedding, try making just one or two flowers a day. Quilling is something that simply can't be rushed... just enjoy the process.

If you've come across this page looking for someone to make place cards or favor boxes for your wedding, please don't ask me. :) Seriously, I'm not a fan of making multiples of anything. I recommend heading to Etsy where you'll find many quillers who will be happy to take on the task.
All Things Paper is an Amazon and Etsy affiliate.
If you should make a purchase using an affiliate link,
a small
commission will be earned at no additional cost to you.
Thank you for helping to defray the rising costs of maintaining this site and newsletter.